Gm Evap Drive Cycle: Quick Guide to Success

To complete the GM Evap Drive Cycle successfully, follow specific steps to ensure the readiness of your Chevy’s EVAP monitor. This process is crucial for proper vehicle emissions testing and compliance.

By understanding and executing the drive cycle correctly, you can avoid issues with your EVAP monitor not being ready, which may impede your vehicle’s performance. Additionally, knowing the duration of a GM drive cycle, usually around fifteen minutes, can help you plan your testing and maintenance schedule effectively.

Stay informed and proactive to ensure your Chevy is running smoothly and meeting emission standards.

Gm Evap Drive Cycle: Quick Guide to Success

Credit: www.youtube.com

Introduction To Gm Evap Drive Cycle

Gm Evap Drive Cycle is an important aspect of the EVAP system in GM vehicles. The EVAP system, or Evaporative Emission Control System, is designed to prevent the release of harmful fuel vapors into the atmosphere. It works by collecting and storing these vapors in a charcoal canister and then purging them into the engine for combustion when conditions are optimal.

A drive cycle refers to a specific set of conditions that a vehicle needs to go through in order to complete various self-tests of the EVAP system. These tests are necessary to ensure that the system is functioning properly and meeting emission standards. Completing a drive cycle typically involves a combination of city and highway driving, as well as specific engine and vehicle operating conditions.

It is important for the EVAP system to be functioning correctly as a malfunctioning system can lead to increased emissions and potentially cause the vehicle to fail emissions tests. By following the GM EVAP drive cycle, you can ensure that the system is properly tested and functioning as intended.

Preparing For The Drive Cycle

Before starting the drive cycle for your vehicle’s EVAP system, it’s important to ensure that the fuel level is between 1/4 and 3/4 of the tank capacity. This range allows for the optimal conditions for the EVAP system to perform its self-tests effectively.

Prior to initiating the drive cycle, make sure that your vehicle is in good working condition with no active trouble codes present. Also, ensure that the tires are properly inflated and that the engine is at operating temperature.

Step-by-step Evap Drive Cycle Process

Getting the EVAP monitor ready in a Chevy requires a proper drive cycle process. This process includes three main phases: initial conditions, driving phase, and post-drive actions.

Procedure Duration
Initial Conditions Vehicle parked overnight, gas tank between 15-85% full, engine cool
Driving Phase Consists of several driving patterns, including steady speeds, deceleration, and acceleration
Post-Drive Actions Turn off the engine and let it cool for 6 hours, then perform a cold start and idle for 2 minutes

Make sure to follow the exact procedure and allow enough time for the process. The GM EVAP drive cycle typically takes about 15 minutes to complete. If the monitor is still not ready, it may indicate issues with the EVAP system. In such cases, it’s best to consult a professional mechanic to diagnose and fix the problem.

Common Challenges And Solutions

Dealing With Incomplete Monitors

When it comes to completing the Evap drive cycle on your GM vehicle, there are a few common challenges you may encounter. One of the main issues is dealing with incomplete monitors. If your Evap monitor is not ready, it can prevent your vehicle from passing emissions tests.

To troubleshoot this problem, there are a few tips you can follow. First, make sure your fuel tank is between 1/4 and 3/4 full, as extreme levels can affect the Evap system. Additionally, ensure your vehicle has been driven at least 15 minutes, preferably on the highway, to allow the system to reach the necessary operating temperature.

If your Evap monitor is still not ready, you may need to perform several drive cycles. This involves driving your vehicle under specific conditions to allow the system to run its self-tests. Consult your vehicle’s manual or a professional technician for the exact drive cycle procedure.

By following these troubleshooting tips, you can increase the chances of completing the Evap drive cycle successfully and passing emissions tests.

How Long Should A Gm Drive Cycle Take?

Completing a GM Evap drive cycle can take up to fifteen minutes. However, the expected time frame for the drive cycle may vary depending on the specific vehicle model and its operating conditions. Factors affecting the duration of the drive cycle include the ambient temperature, the vehicle’s fuel level, and the type of driving conditions. For instance, driving on the highway or in the city can affect the length of the drive cycle. Moreover, other factors that may cause the Evap monitor not to be ready include a malfunctioning oxygen sensor heater or a diesel drive cycle. In summary, completing a GM Evap drive cycle can take up to fifteen minutes, but the expected time frame may vary depending on the vehicle’s operating conditions and other factors that may affect the monitor’s readiness.

Gm Evap Drive Cycle: Quick Guide to Success

Credit: www.justanswer.com

Drive Cycle Verification

Verify the GM EVAP drive cycle to ensure proper system functioning. Completing this cycle helps prepare the EVAP monitor for emissions testing.

Gm Evap Drive Cycle
Drive Cycle Verification
Using OBD-II Scanners Visual Inspection To ensure your vehicle’s EVAP system readiness, perform a drive cycle with specific parameters. The process involves driving at various speeds and engine loads. Additionally, conduct a visual inspection to check for any signs of leaks or damage. Using an OBD-II scanner, monitor the EVAP system for readiness status. If the monitor is not ready, follow the recommended drive cycle procedures. Regular maintenance and monitoring help ensure proper EVAP system functionality.

Impact Of Driving Conditions

To get the EVAP monitor ready in a GM vehicle, it is important to complete an EVAP drive cycle. This process typically takes around 15 minutes and involves driving the vehicle under specific conditions. Failure to complete the drive cycle may result in the EVAP monitor not being ready, which can cause issues during smog checks.

Gm Evap Drive Cycle
Impact of Driving Conditions
Weather and Temperature
Urban vs. Highway
Driving conditions, including weather and temperature, play a significant role in the Gm Evap Drive Cycle. Urban driving involves frequent stops and starts, affecting the cycle differently than highway driving. In urban areas, the cycle may take longer due to traffic, while on highways, it may complete more efficiently. Weather variations, such as extreme temperatures, can impact the completion of the cycle. Understanding these factors is crucial for ensuring the successful execution of the Gm Evap Drive Cycle.
Gm Evap Drive Cycle: Quick Guide to Success

Credit: m.youtube.com

Beyond The Drive Cycle

When it comes to maintaining the EVAP system health, it’s important to understand the GM EVAP drive cycle. This process helps ensure the proper functioning of the system, preventing issues such as a not ready EVAP monitor. If you encounter persistent problems with the EVAP system, it’s advisable to seek professional help. A professional technician can diagnose and address any underlying issues that may be causing the EVAP monitor not to be ready. By understanding the GM EVAP drive cycle and knowing when to seek professional help, you can maintain the health of your vehicle’s EVAP system and ensure it operates efficiently.

Frequently Asked Questions

How Do I Get My Chevy Evap Monitor Ready?

To get your Chevy EVAP monitor ready, you can follow these steps: 1. Ensure your fuel tank is between 1/4 and 3/4 full. 2. Start the engine and let it idle for 2 minutes. 3. Accelerate to 55 mph and maintain that speed for 10 minutes.

4. Slow down to 20 mph and continue driving for 5 minutes. 5. Finally, stop the vehicle and let it idle for 2 minutes. By completing this drive cycle, your EVAP monitor should be ready.

How To Complete An Evap Drive Cycle?

To complete an EVAP drive cycle, you need to follow the specific GM OBD II drive cycle procedure which includes a series of driving conditions that will allow the vehicle’s onboard computer to run diagnostic checks on the EVAP system.

The procedure typically involves driving the vehicle for 15 minutes at various speeds and engine loads. It’s important to ensure the fuel tank is between 1/4 and 3/4 full and that there are no check engine lights or warning messages displayed.

How Long Is A Gm Drive Cycle?

A GM drive cycle typically lasts for about fifteen minutes.

Why Is My Evap Monitor Not Ready?

The evap monitor may not be ready due to incomplete drive cycles. Ensure you follow the GM OBD II drive cycle procedure, which typically takes around fifteen minutes. This will help set the monitors and make the evap monitor ready.

Conclusion

Completing the GM Evap drive cycle is essential for ensuring your vehicle’s emissions system is ready for an inspection. By following the specific drive cycle procedure, you can help your vehicle’s Evap monitor to become ready, ensuring compliance with emissions regulations and a smoother inspection process.

Fuel System Monitor Not Ready: Quick Fixes & Insights

To make the fuel system monitor ready, ensure that the Malfunction Indicator Light (MIL) is not on, have sufficient fuel in the vehicle, and complete the drive cycle. The fuel system monitor allows the PCM to evaluate the fuel control system’s ability to regulate the fuel mixture for optimal air/fuel ratio in the combustion chamber.

If the fuel system monitor is not ready, it may indicate a malfunction in the fuel delivery system. Use a VAG capable scan tool to check fuel trims, and if they are high, investigate the cause. It is essential to have the fuel system monitor in a ready state for a successful emissions test.

Introduction To Fuel System Readiness

Having a ‘Ready’ fuel system is crucial for the proper functioning of a vehicle. A ‘Ready’ status ensures that the fuel system monitor is fully operational and compliant with emissions standards. On the contrary, a ‘Not Ready’ status indicates that the fuel system monitor is not functioning optimally, potentially leading to increased emissions and decreased fuel efficiency. Additionally, a ‘Not Ready’ status may result in a failed emissions test, causing inconvenience and potential financial implications for the vehicle owner. Therefore, it is essential to address any issues related to the fuel system monitor to maintain vehicle performance and compliance with environmental regulations.

Fuel System Monitor Not Ready: Quick Fixes & Insights

Credit: www.focusst.org

Identifying The ‘not Ready’ State

When it comes to identifying the ‘Not Ready’ state of the fuel system monitor, there are common symptoms and alerts that you should be aware of. The fuel system monitor allows the PCM to evaluate how close the fuel control system can regulate the fuel mixture in attempting to achieve an optimum air/fuel ratio in the combustion chamber throughout varying engine rpm and load ranges. If the monitor is not ready, it means that the PCM has not yet completed its diagnostic tests on the fuel system.

To diagnose readiness, OBD-II can be used. First, make sure that the MIL (Malfunction Indicator Light) is not commanded on. Second, make sure that you have enough fuel in the car. Third, complete the so-called “drive cycle”. This involves driving the car under specific conditions, which vary depending on the make and model of the vehicle.

Primary Causes Of ‘not Ready’ Status

One common reason for the ‘not ready’ status is incomplete drive cycles. The vehicle’s onboard diagnostic system requires a specific set of driving conditions to complete its self-tests. Failure to meet these conditions will result in the monitor showing as ‘not ready.’

Another key cause is the malfunction indicator light triggers. If the vehicle has recently had a trouble code cleared or the battery disconnected, it can reset the readiness monitors, causing them to show as ‘not ready.’ It is crucial to ensure that these triggers are not activated before attempting an emissions test or inspection.

Essential Pre-check Steps

When the fuel system monitor is not ready, there are essential pre-check steps that you can take to make it ready. Firstly, ensure that the MIL (Malfunction Indicator Light) is not commanded on. Secondly, make sure that your car has enough fuel. It is important to note that the fuel system monitor evaluates how close the fuel control system can regulate the fuel mixture. This is in an attempt to achieve an optimum air/fuel ratio in the combustion chamber throughout varying engine rpm and load ranges. Thirdly, complete the drive cycle, which is also called the OBD-II readiness monitor. This will allow the PCM to evaluate the fuel control system. By following these steps, you can make the fuel system monitor ready and ensure that your car passes its emissions test.

Related Links Descriptions
OBD Readiness Monitors Explained This link explains what the OBD readiness monitors are and what they do.
Fuel System Monitor – OBDII – nyvip This link provides information about the fuel system monitor and its role in the OBDII system.
How OBD-II Monitors The Fuel Delivery System This link explains how the OBD-II monitors the fuel delivery system and what can cause the fuel system monitor to indicate a malfunction.

Completing A Drive Cycle Successfully

Completing a drive cycle successfully is crucial to ensure that the fuel system monitor is ready. Here is a step-by-step guide to help you achieve this:

  1. First, make sure that the Malfunction Indicator Light (MIL) is not on.
  2. Next, ensure that your vehicle has enough fuel.
  3. Now, it’s time to complete the drive cycle. This involves driving your vehicle under specific conditions, such as a mix of city and highway driving, at various speeds and for a certain duration.
  4. During the drive cycle, the fuel control system will be evaluated to determine how well it can regulate the fuel mixture and achieve an optimal air/fuel ratio.
  5. Once the drive cycle is successfully completed, the fuel system monitor will be ready.

Completing a drive cycle can be challenging, but following these steps will increase your chances of success. Remember to consult your vehicle’s manual for specific instructions tailored to your make and model.

Fuel System Monitor Not Ready: Quick Fixes & Insights

Credit: www.reddit.com

Troubleshooting Common Issues

To make the fuel system monitor ready, ensure the MIL is not on and there is enough fuel in the car. Complete the drive cycle. The fuel system monitor allows the PCM to assess the fuel control system’s efficiency in regulating the fuel mixture and achieving an optimal air/fuel ratio in the combustion chamber.

When addressing high fuel trims, check for vacuum leaks and faulty sensors.
Verify the integrity of the fuel injectors and the fuel pressure regulator.
For resolving OBD-II monitor delays, ensure no pending trouble codes exist.
Perform a drive cycle to help the fuel system monitor complete its checks.

Professional Solutions And Tools

The benefits of diagnostic scanners include quick identification of issues, real-time data analysis, and comprehensive system monitoring. These tools provide detailed insights into the fuel system’s performance, enabling precise troubleshooting and efficient repairs.

If you encounter persistent issues with the fuel system monitor, it’s advisable to seek professional assistance. Experienced technicians can conduct thorough diagnostics and implement effective solutions to ensure the proper functioning of the fuel system.

Fuel System Monitor Not Ready: Quick Fixes & Insights

Credit: www.aa1car.com

Preventative Measures And Best Practices

It is crucial to ensure that the MIL is not on and there is adequate fuel in the vehicle. Completing the drive cycle is also essential for the fuel system monitor to be ready. Additionally, the PCM evaluates the fuel control system’s ability to regulate the fuel mixture and achieve an optimal air/fuel ratio. Factors such as high fuel trims can impact the readiness of the fuel system monitor. Decelerating and coasting the vehicle without shifting, touching the brake, or clutch can aid in preparing the fuel system monitor. Regular maintenance and monitoring of the fuel system are vital for long-term vehicle care and optimum performance.

Understanding State Regulations

Understanding State Regulations: Ensure compliance with emission test requirements before facing inspection failures.

Emission Test Requirements: Follow guidelines to avoid fuel system monitor issues during inspections.

Dealing with Inspection Failures: Address fuel system monitor concerns promptly to pass inspections successfully.

Conclusion And Final Insights

To ensure that the fuel system monitor is ready, it is important to address any issues that may cause it to be incomplete. Checking for a malfunction indicator light and completing the drive cycle can help in achieving the optimum air/fuel ratio.

Additionally, ensuring that there is enough fuel in the car is crucial for the fuel system monitor to be ready.

Key Takeaways

The fuel system monitor plays a crucial role in evaluating the fuel control system’s ability to regulate the fuel mixture and achieve an optimum air/fuel ratio. To ensure that the fuel system monitor is ready, follow these steps:

  • Ensure that the Malfunction Indicator Light (MIL) is not illuminated.
  • Make sure that your vehicle has enough fuel.
  • Complete the drive cycle, which involves driving under specific conditions to allow the monitor to run its tests.

By following these steps, you can ensure that your fuel system monitor is ready and in the clear/pass state, which is essential for your vehicle to pass emissions tests. If you encounter any issues or have further questions, consult a professional or contact the manufacturer for assistance.

In the future, it is important to stay updated on fuel system maintenance practices to ensure optimal performance and compliance with emissions standards. Regular maintenance, such as fuel filter replacement and fuel system cleaning, can help prevent issues with the fuel system monitor and ensure the longevity of your vehicle.

Frequently Asked Questions

How To Make A Fuel Monitor Ready?

To make a fuel monitor ready, first make sure that the Malfunction Indicator Light (MIL) is not on. Then, ensure that there is enough fuel in the car. Finally, complete the “drive cycle” to get the monitor ready. The fuel system monitor evaluates how well the fuel control system can regulate the fuel mixture to achieve an optimal air/fuel ratio in the combustion chamber.

If the monitor is not in the ready/clear/pass state, the car will not pass emissions testing.

What Does The Fuel System Monitor Check?

The fuel system monitor checks the fuel control system’s ability to regulate the fuel mixture for optimal combustion.

What Causes The Fuel System Monitor To Indicate A Malfunction?

The fuel system monitor indicates a malfunction due to issues with fuel delivery or system components.

How Do I Get My Obd Monitor Ready?

To get your OBD monitor ready, ensure the MIL is off, have enough fuel, and complete a drive cycle.

Conclusion

Ensuring the MIL is off, having enough fuel, and completing the drive cycle are key for fuel system readiness. It’s crucial for passing emissions tests and maintaining optimal engine performance. Stay informed and proactive to keep your vehicle in top condition.

O2 Sensor Monitor Not Ready: Quick Fix Guide

If your O2 sensor monitor is not ready, it means your vehicle’s computer has not completed emissions system checks. This can prevent the OBD inspection from finishing until all checks are completed.

Understanding why this occurs and how to resolve it is crucial for passing emissions tests and ensuring your vehicle is operating efficiently. When the O2 sensor monitor shows as “not ready,” it does not necessarily indicate a malfunction; rather, it suggests that certain checks have not been finalized.

This situation often arises after the vehicle’s computer has been reset or if specific driving conditions have not been met to allow for the completion of the necessary system checks. By addressing the underlying causes and following proper drive cycles, you can help ensure your O2 sensor monitor is ready for the emissions test.

O2 Sensor Monitor Not Ready: Quick Fix Guide

Credit: www.e46fanatics.com

Introduction To O2 Sensor Readiness

O2 Sensor Monitor Not Ready

A “not ready” result means your vehicle’s computer has not had a chance to check all of the parts of the emissions control system for problems – so it cannot determine if everything is working as designed. Until the vehicle is “ready” to complete the checks, the OBD inspection cannot complete.

Just because it is “not ready” does not mean that it’s broken and needs repair. For whatever reason, the computer got reset. This initiates a stored OBD DTC.

Reasons For ‘not Ready’ Status

Reasons for ‘Not Ready’ Status:

When the O2 sensor monitor status is ‘Not Ready’, it means that the vehicle’s computer has not had the opportunity to check all the parts of the emissions control system for problems. This status indicates that the computer cannot determine if everything is working as designed, and as a result, the OBD inspection cannot be completed.

Impact of Resetting the Computer:

Just because the O2 sensor monitor status is ‘Not Ready’ does not necessarily mean that there is a problem with the sensor. In some cases, the computer may have been reset, which can initiate the ‘Not Ready’ status. This can happen for various reasons, and it doesn’t always indicate a malfunction. It is important to understand that resetting the computer can affect the readiness status of the O2 sensor monitor.

Weak Battery and Sensor Readiness:

If the O2 sensor monitor status is ‘Not Ready’, and the oxygen sensor and catalyst monitors are also not ready, a weak battery could be the culprit. It is recommended to check the battery and replace it if it is more than four years old. A weak battery can affect the readiness of the sensors and prevent them from completing the necessary checks.

Drive Cycle Basics

A “Not Ready” result on the O2 Sensor Monitor means that the vehicle’s computer has not had a chance to check all parts of the emissions control system for problems, so it cannot determine if everything is working as designed. Until the vehicle is “ready” to complete the checks, the OBD inspection cannot complete. To get the O2 Sensor Monitor ready, you need to complete a drive cycle, which is a series of specific driving conditions that enable the vehicle’s computer to test various emissions control systems. The drive cycle consists of different phases, including the cold start phase, the warm-up phase, the acceleration phase, and the steady-state phase. Understanding these phases is important because completing each phase correctly is essential to get the O2 Sensor Monitor ready. Some factors can affect the readiness of the O2 Sensor Monitor, such as a weak battery or the ECU being reset. In such cases, you need to troubleshoot the issue to determine the cause and fix it to complete the drive cycle successfully.

Steps To Reset O2 Sensor Monitor

O2 Sensor Monitor Not Ready

Before starting the drive cycle, ensure that the vehicle’s fuel tank is between 1/4 and 3/4 full. Also, make sure that there are no pending or active trouble codes in the engine control unit.

For successful resetting, drive the vehicle at a steady speed between 45-65 mph for about 10-20 minutes. Additionally, perform several deceleration and acceleration cycles during the drive cycle.

Common Mistakes To Avoid

A “not ready” result for the O2 sensor monitor means that the vehicle’s computer has not had a chance to check all the parts of the emissions control system for problems. This means that it cannot determine if everything is working as designed. Until the vehicle is “ready” to complete the checks, the OBD inspection cannot complete. To avoid premature diagnostic checks, it is important to avoid resetting the vehicle’s computer before an inspection. Additionally, ignoring battery health can also lead to the O2 sensor monitor not being ready. If the oxygen sensor and catalyst monitors are also not ready, the culprit is most likely a weak battery. If your battery is more than four years old, replace it to ensure that your vehicle passes the OBD inspection.

Tips For Successful Monitor Setting

To ensure your O2 sensor monitor is ready, follow these tips for successful monitor setting. Drive your vehicle for at least 20 minutes on the highway and 10 minutes in the city, avoid sudden stops and starts, and make sure your car is up to operating temperature.

Additionally, avoid resetting your car’s computer and disconnecting the battery before an inspection.

To prepare the O2 sensor monitor:
– Check for specific drive cycle requirements for your vehicle.
– Ensure the battery is in good condition for optimal performance.
– Drive at varying speeds and distances to trigger sensor readiness.
– Perform a mix of highway and city driving to cover different conditions.

When To Seek Professional Help

If your vehicle’s O2 sensor monitor consistently shows a ‘Not Ready’ status, it indicates that the emissions control system has not completed all necessary checks. This prevents the OBD inspection from being finalized, potentially leading to compliance issues. Understanding the OBD codes is crucial in diagnosing the root cause of the persistent ‘Not Ready’ status. Professional help may be necessary to identify and resolve the underlying issues effectively, ensuring the proper functioning of the emissions control system.

O2 Sensor Monitor Not Ready: Quick Fix Guide

Credit: forum.ih8mud.com

Preventive Measures And Maintenance

Regularly checking the O2 sensor monitor is crucial for ensuring proper emission system function. It is also important to maintain the health of the vehicle battery. Performing routine checks for emission systems can help identify issues early and prevent the O2 sensor monitor from showing a “not ready” status. Additionally, ensuring the vehicle battery is in good condition can contribute to the overall health of the emission system and aid in preventing the O2 sensor monitor from being unready. Regular maintenance and timely inspections are essential for addressing any potential problems and maintaining the proper functioning of the emission system.

Conclusion: Ensuring Emission Compliance

To ensure emission compliance, it is important to address the issue of the O2 sensor monitor not being ready. A “not ready” status indicates that the vehicle’s computer has not completed the necessary checks on the emissions control system. It is essential to follow the drive cycle guidelines to reset the O2 sensor monitor and achieve emission compliance.

O2 Sensor Monitor Not Ready
Conclusion: Ensuring Emission Compliance
Summarizing Key Points
Importance of O2 Sensor Health

To ensure emission compliance, it’s crucial to address O2 sensor monitor readiness. When the system shows “not ready,” it indicates pending checks. This status results from incomplete diagnostics of emission control components. It’s vital to resolve this issue to pass OBD inspections effectively. Understanding the importance of O2 sensor health is key to maintaining emission standards and vehicle performance.
O2 Sensor Monitor Not Ready: Quick Fix Guide

Credit: www.youtube.com

Frequently Asked Questions

How To Get A 02 Sensor Monitor Ready?

To get the oxygen sensor monitor ready, you need to complete a specific drive cycle. This involves driving your car under certain conditions for a set amount of time. The drive cycle can vary depending on your vehicle make and model.

Once the drive cycle is completed, the oxygen sensor monitor will be ready for inspection. It’s important to note that a “not ready” result means the vehicle’s computer hasn’t checked all parts of the emissions control system for problems.

How Long Does It Take For An O2 Sensor Monitor To Be Ready?

The O2 sensor monitor typically takes a few driving cycles to be ready. It’s important to drive the vehicle under various conditions, including both city and highway driving, to allow the monitor to complete its checks. Once the monitor is ready, it can determine if the emissions control system is functioning properly.

How Many Miles Do You Have To Drive To Reset An Oxygen Sensor?

You typically need to drive around 50 to 100 miles to reset an oxygen sensor.

What Does O2 Sensor Not Ready Mean?

An O2 sensor not ready means that the vehicle’s computer has not completed the necessary checks on the emissions control system. This could be due to a reset or a problem with the system. It does not necessarily mean that the sensor is broken and needs repair.

Conclusion

Understanding why your O2 sensor monitor is not ready is crucial. It’s not a sign of immediate repair needs, but rather a system check delay. Following proper drive cycles and maintenance can help your vehicle pass OBD inspections smoothly. Stay informed and proactive for optimal performance.

Evap System Monitor Incomplete: Quick Fix Guide

The Evap System Monitor Incomplete indicates that the ECU has not gone through a complete drive cycle to verify the validity of the tests. It does not indicate a problem, but it also does not pass an emissions inspection.

However, most locales with emissions testing allow one or two incomplete monitors (except the catalytic monitor) and still pass the inspection. In some cases, a bad EVAP component, such as a fuel tank pressure sensor or purge valve, can prevent the tests from running.

It is important to follow the specific procedures and guidelines provided by the manufacturer to ensure that the EVAP monitor is ready for inspection.

Introduction To The Evap System

The EVAP system plays a crucial role in emissions control by preventing fuel vapors from escaping into the atmosphere. Common reasons for an incomplete EVAP system monitor include loose, damaged, or missing gas caps, as well as drive cycle issues. Other potential causes may involve the failure of EVAP components such as the fuel tank pressure sensor or purge valve. It’s essential to address these issues to ensure compliance with emissions standards and pass the smog check. Understanding the significance of the EVAP system and the reasons behind incomplete monitor status is vital for maintaining vehicle performance and environmental responsibility.

Evap System Monitor Incomplete: Quick Fix Guide

Credit: m.youtube.com

Understanding Evap Monitor Status

When it comes to emissions testing, it’s important to understand the status of the EVAP monitor. An incomplete monitor does not necessarily mean there’s a problem with your vehicle’s EVAP system. Instead, it simply indicates that the ECU has not been driven through a complete drive cycle to verify the validity of the tests. This can result in a “not ready” status for the EVAP monitor, which can prevent your vehicle from passing an emissions inspection.

It’s important to note that an incomplete monitor is different from cleared codes. Cleared codes indicate that a fault was detected in the past but has since been resolved, while an incomplete monitor simply means that the ECU has not yet completed the necessary tests.

If your vehicle’s EVAP monitor is incomplete, there are a few potential causes. Drive cycle issues can prevent the necessary tests from completing, while a faulty EVAP component can also be to blame. In some cases, one or two incomplete monitors may be allowed during emissions testing, but it’s always best to ensure that all monitors are ready before taking your vehicle in for inspection.

Pre-checklist Before Troubleshooting

Before troubleshooting an incomplete Evap system monitor, make sure you have the required tools and equipment. You will need an OBD-II scanner, EVAP smoke machine, and a multimeter. Also, ensure that you have taken the necessary safety precautions and prepared the vehicle for testing.

Tools And Equipment Needed

  • OBD-II scanner
  • EVAP smoke machine
  • Multimeter

Safety Precautions And Preparation

  • Make sure the vehicle is parked on a level surface.
  • Ensure that the battery voltage is stable and above 12 volts.
  • Wear eye protection and gloves while handling chemicals.
  • Ensure that the fuel tank is less than 85% full.
  • Disable the vehicle’s anti-theft system.
  • Warm up the engine before testing.
Evap System Monitor Incomplete: Quick Fix Guide

Credit: www.tacomaworld.com

Common Causes For Evap Monitor Incompletion

When it comes to incomplete EVAP system monitors, there are several common causes that can lead to this issue. One of the main reasons is drive cycle issues, where the vehicle has not gone through a complete drive cycle to verify the validity of the tests. This can happen if the vehicle has not been driven under the specific conditions required for the monitors to complete. In such cases, it is important to address the drive cycle issues and follow the recommended procedures to ensure the monitors can complete successfully.

Faulty EVAP components can also contribute to incomplete monitors. If there are issues with components such as the fuel tank pressure sensor or purge valve, it can prevent the tests from running properly. Diagnosis of these components and proper repair or replacement is necessary to resolve the incomplete monitor problem.

Step-by-step Guide To Completing The Evap Monitor

Completing the EVAP Monitor: When it comes to ensuring the EVAP system monitor is complete, it’s crucial to perform the drive cycle correctly. Following the specific drive cycle for your vehicle is essential to triggering the readiness of the EVAP monitor. Additionally, it’s important to consider that certain car models may have special requirements for completing the EVAP monitor. Taking into account these specific considerations for your car model can help ensure the successful completion of the EVAP monitor readiness.

Troubleshooting Tips For Persistent Issues

If the EVAP monitor remains incomplete, seek professional assistance for accurate diagnosis and repair.

Ensure drive cycle completion to address incomplete EVAP monitors for successful emissions testing.

Consult with a mechanic to resolve persistent EVAP system issues effectively.

Resetting The Evap System Monitor

When it comes to resetting the EVAP system monitor, it’s essential to follow specific reset procedures for different vehicle makes. After the reset, ensuring monitor readiness post-reset is crucial to prevent any issues.

State-specific Emissions Testing Information

When dealing with incomplete monitors in emissions-strict states, it’s crucial to understand state-specific emissions testing information. For instance, in California, the requirements are particularly stringent. An incomplete monitor doesn’t necessarily indicate a problem; rather, it signifies that the ECU hasn’t undergone a complete drive cycle to validate the tests. While it doesn’t result in an emissions inspection failure, it also doesn’t pass. In such cases, it’s important to address drive cycle issues and ensure that the OBD monitors are completed as per the regulations. Most locales with emissions testing allow one or two incomplete monitors, except for the catalytic monitor, while still passing the test. Therefore, understanding the specific requirements and taking appropriate measures is essential for addressing incomplete monitors in emissions-strict states.

Evap System Monitor Incomplete: Quick Fix Guide

Credit: www.youtube.com

Frequently Asked Questions

How Do I Get My Evap Monitor Ready?

To get your evap monitor ready, drive through a complete drive cycle to validate the tests.

What Does Evap Incomplete Mean?

An incomplete EVAP monitor means the car’s ECU hasn’t completed a full drive cycle to validate tests. It doesn’t pass emissions but doesn’t fail either.

Can I Pass The Smog Check If The Evap Monitor Is Incomplete?

No, if the EVAP monitor is incomplete, you will not pass the smog check. An incomplete monitor indicates that the ECU has not undergone a complete drive cycle to verify the validity of the tests. While it doesn’t mean there is a problem, it does mean that the emissions inspection cannot be passed.

What Will Cause An Evap Monitor Not To Be Ready?

An incomplete EVAP monitor means that the ECU has not completed a drive cycle to verify the validity of tests. This does not necessarily indicate a problem and does not cause a failure in emissions inspection. Drive cycle issues are the main cause of an incomplete monitor.

Conclusion

Understanding why the Evap system monitor shows incomplete is crucial for passing emissions. It simply means the ECU hasn’t completed a full drive cycle to validate tests. Knowing how to address this issue can help ensure your vehicle is ready for a smog check.

How Many Lug Nuts Are On A Standard Car Wheel?: Quick Guide

A standard car wheel typically has either four or five lug nuts to secure it in place. Five lug nuts are considered safer as they can still hold the wheel in case one is damaged or falls off.

When it comes to vehicle safety, ensuring all lug nuts are present and properly tightened is crucial to prevent accidents and maintain stability while driving. The lug nuts play a critical role in keeping the wheel securely attached to the vehicle, so it’s essential to regularly check them for any signs of damage or loosening.

Driving with missing or loose lug nuts can lead to unsafe conditions and potential accidents, making it important to address any issues promptly. Remember, safety first when it comes to your vehicle’s maintenance and upkeep.

How Many Lug Nuts Are On A Standard Car Wheel?: Quick Guide

Credit: www.tirerack.com

Introduction To Car Wheel Lug Nuts

How Many Lug Nuts Are On A Standard Car Wheel

Car wheel lug nuts are essential for securing the wheels to the vehicle. The number of lug nuts on a standard car wheel typically ranges from four to five. These nuts play a crucial role in maintaining the safety and stability of the vehicle while in motion. It’s important to ensure that all lug nuts are present and properly tightened to prevent any potential issues related to wheel security.

Wheel security is a critical aspect of vehicle maintenance. The lug nuts are responsible for keeping the wheels firmly attached to the vehicle, and any missing or loose lug nuts can pose a significant safety risk. It’s essential to regularly inspect the lug nuts and ensure they are properly tightened to maintain the overall safety and performance of the vehicle.

Most passenger cars are equipped with four or five lug nuts per wheel. The number of lug nuts may vary based on the specific make and model of the vehicle, so it’s important to refer to the manufacturer’s recommendations for the correct lug nut specifications. Maintaining the appropriate number of lug nuts and ensuring they are securely fastened is crucial for safe and reliable vehicle operation.

Lug Nut Variations Across Vehicles

How Many Lug Nuts Are On A Standard Car Wheel

When it comes to the number of lug nuts on a car wheel, it varies based on the vehicle type. Generally, passenger cars have either four or five lug nuts, with the latter providing added safety in case of damage to one nut. SUVs and small pickups also typically have a five-lug pattern. Larger vehicles such as trucks may have six or more lug nuts due to the increased weight and load they carry. The size and number of lug nuts are essential for ensuring proper wheel security and stability, and it’s crucial to adhere to the manufacturer’s specifications for each vehicle.

Standard Lug Nut Sizes

When it comes to standard car wheels, the number of lug nuts can vary depending on the size of the vehicle. Typically, passenger cars, SUVs, and small pickups have wheels with four or five lug nuts. Five-lug patterns are considered safer as they can still secure the wheel if one lug nut is damaged or falls off. Larger vehicles, such as heavy-duty trucks, may have more lug nuts to accommodate the weight and size of the vehicle.

Common lug nut dimensions include 12mm x 1.5, 12mm x 1.25, 14mm x 1.5, and 7/16-20. Measuring for the right fit is important to ensure the lug nuts properly secure the wheel. To measure, use a caliper or ruler to measure the diameter of the stud and the distance between the studs.

It’s important to note that driving with a missing lug nut is not safe as it can cause uneven pressure on the wheel hub and potentially lead to a wobbly ride or even wheel stud failure. It’s recommended to replace missing or damaged lug nuts as soon as possible to ensure the safety of the vehicle and its passengers.

How Many Lug Nuts Are On A Standard Car Wheel?: Quick Guide

Credit: www.quora.com

The Role Of Lug Nuts In Vehicle Safety

The number of lug nuts on a standard car wheel can vary depending on the make and model of the vehicle. However, most passenger cars typically have four or five lug nuts. The role of lug nuts is crucial in ensuring proper wheel attachment and overall vehicle safety. Missing lug nuts can lead to consequences such as uneven pressure on the wheel hub, wobbling wheels, and potential wheel stud failure. It’s essential to regularly check and maintain lug nuts to prevent any mishaps.

Racing Cars Vs Standard Cars

When it comes to racing cars vs standard cars, one noticeable difference is the lug nut system. In NASCAR, racing cars use a single lug nut system, which is designed to be quicker and more efficient during pit stops. This system allows the tire to be changed in a matter of seconds, contributing to faster race times.

On the other hand, standard cars use multiple lug nuts to secure the wheels. This is primarily for safety reasons. Having multiple lug nuts distributes the pressure evenly, ensuring that the wheels stay securely attached to the car. In case one lug nut becomes loose or damaged, the other lug nuts can still hold the wheel in place.

Overall, while the single lug nut system may be suitable for racing cars, standard cars require the added security of multiple lug nuts to ensure safe and reliable driving.

How Many Lug Nuts Are On A Standard Car Wheel?: Quick Guide

Credit: www.tireagent.com

Installation And Removal Tips

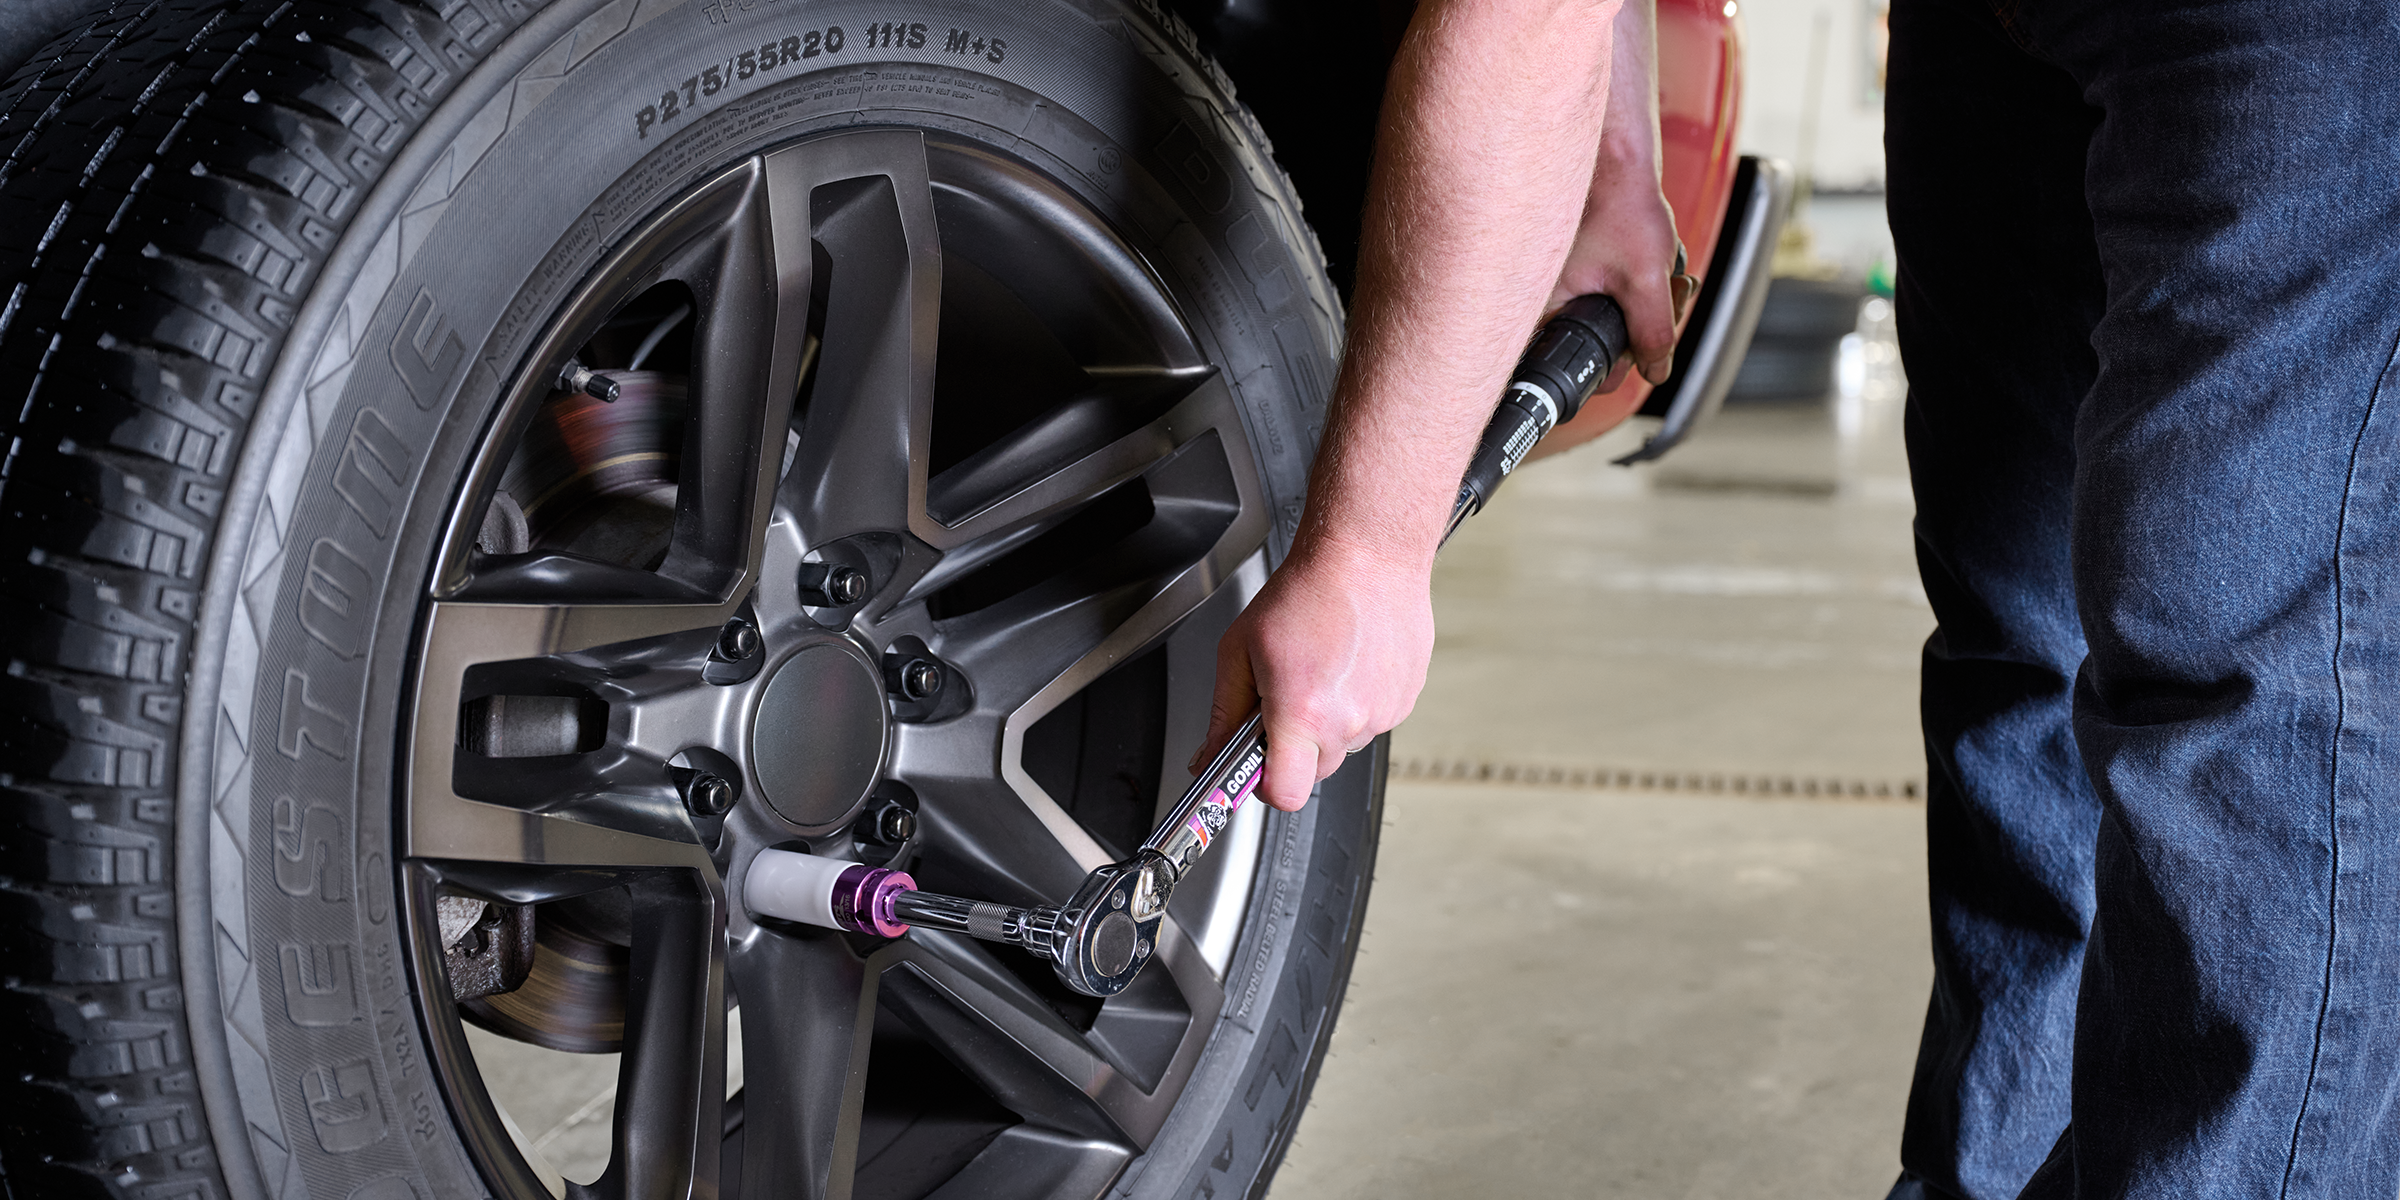
When installing or removing lug nuts, correctly tightening them is crucial. Use a torque wrench to ensure they are tightened to the manufacturer’s specifications. Safely removing lug nuts involves using the right tools and techniques to prevent damage to the wheel or studs.

Anti-theft Lug Nuts

Standard car wheels typically have four or five lug nuts. The number of lug nuts can vary based on the vehicle’s size. Larger vehicles generally have more lug nuts, while smaller vehicles have fewer. The lug nuts play a crucial role in securing the wheel to the vehicle. Additionally, it is unsafe to drive with a missing lug nut as it can lead to uneven pressure on the wheel hub, causing the wheels to wobble. If a lug nut is missing, the remaining ones endure extra pressure and wear out faster, potentially resulting in a wobbly ride. Therefore, it’s essential to ensure that all lug nuts are present and properly secured to maintain safe driving conditions.

Maintenance And Upkeep

When it comes to maintenance and upkeep, it’s crucial to regularly check the integrity of lug nuts on your car wheels. Replacing worn or damaged lug nuts is essential for ensuring the safety and stability of your vehicle while driving. Driving with a missing lug nut can lead to uneven pressure on the wheel hub and increase the likelihood of wheel wobbling. For most passenger cars, the standard number of lug nuts is four or five. Having five lug nuts is considered safer as it can still secure the wheel if one becomes damaged or falls off.

Understanding Bolt Patterns

Understanding bolt patterns is crucial when it comes to changing your car’s wheels. For most passenger cars, the standard number of lug nuts on a wheel is four or five. It’s important to make sure you have the correct number and size of lug nuts to ensure the safety of your vehicle.

Understanding Bolt Patterns
Defining Bolt Patterns
Matching Lug Nuts to Bolt Patterns
For most passenger cars, the standard number of lug nuts on a wheel is typically four or five. Having five lug nuts is considered safer as it can still secure the wheel in case one is damaged or falls off. Larger vehicles usually have more lugs, while smaller ones have fewer. Driving with a missing lug nut is not safe as it can lead to uneven pressure on the wheel hub, causing potential wobbling. It is crucial to ensure all lug nuts are securely fastened to maintain optimal safety while driving.

Faqs On Lug Nuts

Can You Drive with a Missing Lug Nut?

Driving with a missing lug nut is not safe. It can cause uneven pressure on the wheel hub, leading to wobbling wheels. Additionally, the wheel studs may snap off along with the wheels themselves. Therefore, it is important to ensure that all lug nuts are properly secured.

Choosing the Right Lug Nut for Your Wheel

When it comes to choosing the right lug nut for your wheel, there are a few factors to consider. Firstly, determine the number of lug nuts required for your specific wheel. For most passenger cars, the standard is four or five lug nuts. Five lug nuts are considered safer as they can still secure the wheel if one is damaged or falls off. Secondly, consider the size and thread pitch of the lug nuts to ensure they are compatible with your wheel’s bolt pattern.

Frequently Asked Questions

How Many Nuts Does A Car Wheel Have?

A standard car wheel typically has four or five lug nuts. Five lug nuts are considered safer as they can still secure the wheel if one is damaged or falls off. It is not safe to drive with a missing lug nut as it can cause uneven pressure on the wheel hub and potentially lead to dangerous wobbling.

How Many Lugs Does A Wheel Have?

Most standard car wheels have either four or five lug nuts for securing the wheel.

Is It Okay To Drive On 4 Lug Nuts?

Yes, it is not safe to drive on 4 lug nuts as it can cause uneven pressure on the wheel hub, leading to potential wobbling and safety hazards. It’s recommended to have all lug nuts properly secured for safe driving.

Can I Drive With One Lug Nut Missing?

Driving with one lug nut missing is not safe. The missing lug nut can cause uneven pressure on the wheel hub, leading to wheel wobbling. It also puts extra strain on the remaining lug nuts, causing them to wear out faster.

It is important to have all lug nuts securely fastened to ensure safe driving.

Conclusion

Understanding the number of lug nuts on a standard car wheel is essential. Typically, cars have four or five lug nuts, with five being considered safer. Driving with missing lug nuts can lead to unsafe conditions and potential damage. It’s crucial to maintain all lug nuts for safety.

What Should the Evap System Vapor Pressure Be: Key Insights

The Evap system vapor pressure should be within the specified range to be considered normal. A low-pressure reading indicates a large leak, while a high-pressure reading just below specification indicates a small leak.

Monitoring the vapor pressure is crucial for maintaining fuel economy and environmental safety. It is recommended to use a smoke machine to accurately pressure-test the Evap system and identify any potential leaks. Proper evaluation of the Evap system vapor pressure helps in ensuring the overall efficiency and functionality of the vehicle’s emission control system.

Introduction To Evap Systems

The ideal vapor pressure for an EVAP system typically falls within a specific range, indicating proper functionality. High pressure suggests a minor leak, while low pressure signals a larger one. Monitoring and maintaining the correct vapor pressure is crucial for optimal system performance.

Introduction to EVAP Systems
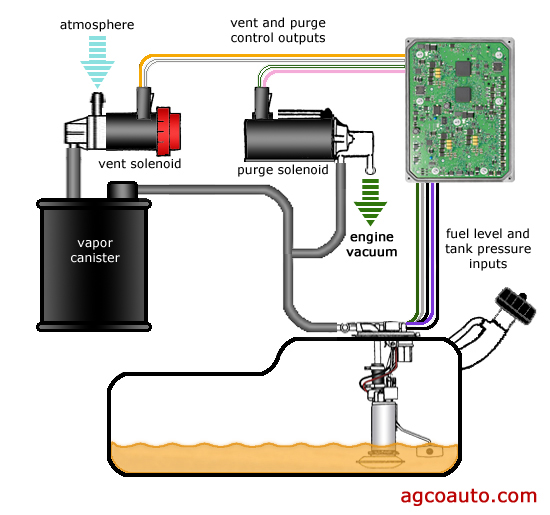
The EVAP system plays a crucial role in controlling emissions and fuel vapors. It consists of various components such as the charcoal canister, purge valve, and vent valve. These components work together to capture and store fuel vapors and then later introduce them back into the engine for combustion. Monitoring the evap system vapor pressure is essential to ensure the system is functioning properly. High or low pressure readings can indicate potential issues such as leaks or faulty valves. Regular evap system inspections can help maintain optimal performance and prevent environmental harm.
What Should the Evap System Vapor Pressure Be: Key Insights

Credit: www.agcoauto.com

Understanding Vapor Pressure

Understanding vapor pressure is crucial when it comes to the EVAP system. Vapor pressure is defined as the pressure exerted by the vapor of a substance in equilibrium with its solid or liquid phase. In the EVAP system, vapor pressure is important because it helps to prevent fuel vapors from escaping into the atmosphere. The normal range of EVAP system vapor pressure can vary depending on the make and model of the vehicle. A high-pressure reading just below specification can indicate a small leak, while a low-pressure reading indicates a large leak. To test the EVAP system, a smoke machine can be used to detect leaks. Regular maintenance of the EVAP system can help to ensure it is functioning properly and reduce the risk of harmful emissions being released into the environment.

Optimal Vapor Pressure Range

Optimal Vapor Pressure Range: The optimal vapor pressure range for an EVAP system typically falls between 0.02 and 0.08 psi. This range ensures efficient operation and minimizes the risk of fuel leakage.

Typical Pressure Readings: Normal readings for EVAP pressure hover around 0.04 psi. A deviation from this range may indicate potential issues with the EVAP system that require attention.

Factors Affecting Vapor Pressure: Various factors, including temperature changes, fuel composition, and system leaks, can influence the vapor pressure within the EVAP system. Monitoring these factors is crucial for maintaining optimal system performance.

What Should the Evap System Vapor Pressure Be: Key Insights

Credit: www.f150ecoboost.net

Diagnosing Evap Pressure Issues

Diagnosing EVAP Pressure Issues
  • Symptoms of Incorrect Vapor Pressure
  • Tools for Pressure Diagnosis

A healthy EVAP system is crucial for fuel economy, environment, and safety. The vapor pressure in the fuel tank must be maintained within a specific range for the EVAP system to function correctly. A low-pressure reading indicates a large leak, and a high-pressure reading, just below specification, indicates a small leak. To diagnose EVAP pressure issues, you need specialized tools, such as a smoke machine, to pressure-test the EVAP system. The smoke machine has a pressure regulator and a one-way check valve built onto the air supply line to provide accurate readings. Additionally, vacuum/pressure reference sheets are available to help determine the normal readings for EVAP pressure while the car is running. Regular maintenance and timely repairs of the EVAP system can prevent costly repairs and ensure optimal vehicle performance.

High Vapor Pressure Causes

High vapor pressure in the EVAP system can be caused by several factors. Common reasons for high readings include a large leak or a small leak in the system. A low-pressure reading indicates a large leak, while a high-pressure reading just below specification indicates a small leak. To diagnose the issue, a smoke machine can be used to pressure-test the EVAP system. The system may also have a pressure regulator and a one-way check valve built onto the air supply line. It is important to note that a healthy EVAP system is essential for fuel economy, environmental friendliness, and safety. The EVAP system vapor pressure parameter can be monitored through a car scanner, and if the readings are erratic, there may be a problem with the system.

It is normal for the EVAP system vapor pressure to vary, but if the pressure is consistently high or fluctuating significantly, it may indicate a malfunction. In such cases, it is recommended to consult a professional mechanic for further diagnosis and repair.

Testing The Evap System

The Evap system vapor pressure should be within a specific range. A low-pressure reading indicates a large leak, while a high-pressure reading suggests a small leak. Testing the Evap system’s vapor pressure can help diagnose any potential issues.

EVAP System Vapor Pressure: A healthy EVAP system ensures fuel economy, environment, and safety.
Normal Range: Low pressure indicates a large leak, high pressure suggests a small leak.
Testing Methods: Use a smoke machine to pressure-test the EVAP system effectively.
Interpreting Results: Monitor EVAP system vapor pressure parameters for optimal functionality.
A healthy EVAP system is crucial for maintaining fuel efficiency and environmental friendliness. Understanding the normal range of vapor pressure is key – low pressure signals a significant leak, while slightly high pressure indicates a minor leak. Utilizing a smoke machine for testing allows for accurate evaluation of the EVAP system. Regularly monitoring and interpreting vapor pressure parameters ensures the system is operating optimally, promoting vehicle safety and emission control.

Maintaining Proper Evap Pressure

What Should the Evap System Vapor Pressure Be

When it comes to maintaining the EVAP system vapor pressure, it is crucial to ensure that the pressure is within the normal range. Normal readings for EVAP pressure while the car is off should typically be around 0.02 to 0.05 inches of mercury (InHg). Troubleshooting common issues related to EVAP pressure involves inspecting the system for leaks, checking the purge valve and ensuring the vent valve is functioning properly. High-pressure readings could indicate a small leak, while low-pressure readings may point to a large leak. Regularly monitoring and testing the EVAP system can help prevent potential issues and ensure proper functioning, contributing to improved fuel economy and environmental friendliness.

Case Studies

Successful EVAP Pressure Corrections: When it comes to repairing EVAP systems, it is crucial to address the challenges associated with correcting EVAP pressure. High pressure readings may indicate a small leak, while low pressure readings can point to a larger leak. Using a smoke machine can assist in pressure-testing the EVAP system and identifying potential issues. Additionally, monitoring the EVAP system vapor pressure parameter can provide valuable insights into the system’s performance. It is important to ensure that the EVAP system is functioning optimally to promote fuel economy, environmental friendliness, and safety.

What Should the Evap System Vapor Pressure Be: Key Insights

Credit: www.motor.com

Frequently Asked Questions

What Is A Normal Evap Vapor Pressure?

A normal EVAP vapor pressure reading is usually between 0. 02 and 0. 14 inches of water gauge (inH2O) or around 0. 75 kPa. A low pressure reading suggests a large leak, while a high pressure reading – just below specifications – indicates a small leak.

A smoke machine can also be used to pressure-test the EVAP system.

What Is The Normal Range Of Evap System?

The normal range of EVAP system vapor pressure is typically around 0. 02 to 0. 08 inches of mercury (inHg).

How Much Pressure To Test An Evap System?

The recommended pressure to test an EVAP system is around 0. 5 to 0. 9 psi (3. 4 to 6. 2 kPa). A smoke machine is also used to test the system, which has a pressure regulator and a one-way check valve built onto the air supply line.

A low-pressure reading indicates a large leak, while a high-pressure reading (just below specification) indicates a small leak.

Why Is My Evap System Vapor Pressure High?

A high evap system vapor pressure indicates a small leak, while a low pressure reading suggests a large leak. Use a smoke machine to pressure-test the system for better accuracy.

Conclusion

Understanding the correct vapor pressure for the EVAP system is crucial for vehicle performance. Monitoring and maintaining the optimal vapor pressure not only ensures fuel efficiency but also contributes to environmental and safety standards. It’s important to address any irregularities in vapor pressure to prevent potential issues.

Evap and O2 Sensor Not Ready: Quick Fix Guide

If the EVAP and O2 sensor are not ready, a weak battery may be the issue. Replace the battery if over four years old and rerun the drive cycle.

When facing issues with emission monitors not setting, such as the oxygen sensor and catalyst monitors, a weak battery is often the cause. To resolve this, consider replacing the battery if it’s more than four years old and redo the drive cycle.

Properly functioning emission monitors are crucial for passing vehicle inspections and ensuring optimal engine performance. In this blog, we will delve deeper into the reasons behind EVAP and O2 sensor not being ready, along with effective solutions to address these issues.

Introduction To Evap And O2 Sensor Issues

Having trouble with your vehicle’s EVAP and O2 sensor not being ready? This issue could be due to a weak battery, especially if the oxygen sensor and catalyst monitors are also not ready. Consider replacing the battery if it’s over four years old and rerun the drive cycle to resolve the problem.

Evap And O2 Sensor Not Ready
Introduction to EVAP and O2 Sensor Issues
Common Symptoms
If the oxygen sensor and catalyst monitors are not ready, the issue might be a weak battery.
For a resolution, consider replacing the battery if it’s over four years old.
Driving cycles play a role in setting the EVAP monitor ready, affecting emissions.

Understanding The Role Of Evap And O2 Sensors

The EVAP and O2 sensors are two critical components of a vehicle’s emission control system. The EVAP system helps to reduce the amount of fuel vapor that escapes into the atmosphere, while O2 sensors monitor the levels of oxygen in the exhaust and help to ensure that the engine is running efficiently. If these sensors are not “ready” during an emissions test, it can result in a failed test.

When it comes to getting these sensors ready, there are a few things you can do. For the EVAP system, it’s important to make sure that your gas cap is tight and that there are no leaks in the system. You may also need to drive the vehicle for a certain number of miles to complete the required drive cycle. As for O2 sensors, a weak battery can be the culprit if they’re not ready. If your battery is over four years old, it may be time for a replacement.

Resources Description
YouTube: Can’t Get Your Car’s Emissions Monitors to Set? A video that provides tips on how to get your car’s emissions monitors to set.
Reddit: Oxygen Sensor “not ready” + evaporative system “not ready” A discussion thread on Reddit about oxygen sensor and evaporative system issues.
JustAnswer: EVAP not ready A forum thread on JustAnswer where users discuss EVAP not ready issues.

Diagnosing Readiness Issues

Diagnosing Readiness Issues

Identifying the ‘Not Ready’ Status:

  • If the oxygen sensor and catalyst monitors are also not ready, the culprit is most likely a weak battery. If your battery is more than four years old, replace it and re-run the drive cycle.

Tools and Techniques for Diagnosis:

  • Helping set Monitors – OBDII: This resource provides information on how to make your evap monitor ready.
  • How many miles does it take to reset an EVAP system?: Find out the approximate mileage required to reset an EVAP system.
  • RepairPal.com: Learn what to do when the drive cycle won’t complete and the oxygen sensor and catalyst monitors are not ready.
  • EVAP monitor not ready no matter what I do: A discussion thread on EnclaveForum.net where users share their experiences and seek help regarding the EVAP monitor not being ready.
  • How to complete the EVAP emissions monitor: A Quora post providing tips on completing the EVAP emissions monitor.
Evap and O2 Sensor Not Ready: Quick Fix Guide

Credit: www.e46fanatics.com

The Battery Connection

Evap And O2 Sensor Not Ready
The Battery Connection
Signs of a Weak Battery: If the oxygen sensor and catalyst monitors are also not ready, the culprit is most likely a weak battery. If your battery is more than four years old, replace it and re-run the drive cycle.

Resetting The Evap And O2 Sensors

If you are facing the issue of EVAP and O2 sensor not ready, you can try resetting the system by following a proper drive cycle. The mileage requirements for system reset may vary depending on your vehicle model and make. It is recommended to refer to the manufacturer’s manual for specific instructions. In addition, a weak battery can also be the culprit for the issue. If your battery is more than four years old, it is recommended to replace it and re-run the drive cycle. You can also refer to online forums and Q&A sites for tips and tricks on resolving the issue. Keep in mind that it is important to take care of the issue as soon as possible to ensure your vehicle passes the emissions test and runs smoothly.

Evap and O2 Sensor Not Ready: Quick Fix Guide

Credit: www.jeeppatriot.com

Troubleshooting Persistent ‘not Ready’ Status

Having trouble with a persistent ‘Not Ready’ status for your Evap and O2 sensors? If your battery is more than four years old, it may be the culprit. Try replacing the battery and rerunning the drive cycle to resolve the issue.

Are you struggling with persistent ‘Not Ready’ status for your Evap and O2 sensors?
Checking for ECU Resets:
If your oxygen sensor and catalyst monitors are also not ready, consider a weak battery as the main issue.
For a battery over four years old, replace it and rerun the drive cycle to resolve the issue.
Advanced Diagnostic Approaches:
Ensure no ECU resets have occurred and meet all prerequisites for the sensors to be ready.

Expert Tips For Quick Fixes

When the evap and O2 sensor are not ready, a weak battery could be the cause. If the battery is over four years old, consider replacing it and rerun the drive cycle.

For short-term solutions, focus on driving the vehicle to reset the evap system. This may require driving a certain number of miles, typically between 50 to 100 miles.

Long-term maintenance advice includes addressing any underlying issues such as a weak battery or faulty sensors. Regular vehicle maintenance can help prevent these issues from reoccurring.

Preventing Future Readiness Issues

Regular maintenance of the vehicle’s battery is crucial to ensure the proper functioning of the evaporative (EVAP) system and oxygen sensors. A weak battery can prevent these systems from being ready during emissions testing, leading to potential issues during inspections. It is recommended to replace the battery if it is more than four years old. Additionally, conducting routine check-ups and ensuring the overall upkeep of the oxygen sensors and EVAP system can contribute to preventing future readiness issues.

Navigating Emissions Testing With ‘not Ready’ Monitors

Having ‘Not Ready’ monitors during emissions testing can lead to failed inspections. It is crucial to address this issue to avoid legal consequences. One effective strategy is to focus on resetting the monitors by ensuring all systems are functioning optimally. For instance, a weak battery can often be the culprit, especially if the O2 sensor and catalyst monitors are also affected. In such cases, replacing the battery and rerunning the drive cycle may help set the monitors to ‘Ready’ status. Additionally, seeking guidance from automotive forums and professional resources can provide valuable insights on resolving the issue.

Evap and O2 Sensor Not Ready: Quick Fix Guide

Credit: m.youtube.com

Faqs On Evap And O2 Sensor Readiness

If you are having trouble with your car’s EVAP and O2 sensor readiness, it is likely due to a weak battery or the ECU being reset. To fix this issue, replace the battery if it is more than four years old and re-run the drive cycle.

Additionally, there are steps you can take to help set the monitors and complete the EVAP emissions monitor.

FAQs on EVAP and O2 Sensor Readiness:
Addressing Common Concerns:
If your vehicle’s EVAP and O2 sensors are not ready, it can be frustrating when trying to pass an emissions test. Here are some frequently asked questions and expert answers to help:
Q: What can cause the EVAP and O2 sensor monitors to not be ready?
A: The most common reason for the monitors not being ready is a weak battery. If your battery is more than four years old, replacing it and re-running the drive cycle can often solve the problem. Other factors, such as a recent reset of the ECU or a faulty sensor, can also affect readiness.
Q: How can I make the EVAP monitor ready?
A: Driving the vehicle in a specific pattern, known as the drive cycle, can help set the EVAP monitor to ready. The exact drive cycle can vary by make and model, so consult your vehicle’s manual or a professional mechanic for guidance.
Q: How many miles do I need to drive to reset the EVAP system?
A: There is no set mileage requirement for resetting the EVAP system. It depends on various factors, including your vehicle’s make and model, driving conditions, and the specific issue causing the monitors to not be ready.
Q: What can I do if the drive cycle won’t complete?
A: If the drive cycle won’t complete, the issue may be a weak battery, as mentioned earlier. It’s also possible that there is a fault in the EVAP or O2 sensor system that needs to be repaired. Consult a professional mechanic for diagnosis and repair.
Q: How can I get the oxygen sensor monitor ready?
A: Like the EVAP system, driving the vehicle in a specific pattern can help set the oxygen sensor monitor to ready. Again, the exact drive cycle can vary by make and model, so consult your vehicle’s manual or a professional mechanic for guidance.

Frequently Asked Questions

Why Is My Evap And O2 Monitor Not Ready?

Your EVAP and O2 monitor may not be ready due to a weak battery. If over four years old, replace it and rerun the drive cycle.

How Do I Make My Evap Monitor Ready?

To make your evap monitor ready, you should first ensure that your battery is not weak. If it is more than four years old, consider replacing it. Additionally, you can try running the drive cycle again. It is also important to drive a sufficient number of miles to reset the EVAP system.

How Long Does It Take For An O2 Sensor To Be Ready?

An O2 sensor typically takes about 30-100 miles of driving to be ready for testing. If the battery is weak, it may take longer. Regular driving should help the O2 sensor become ready for testing.

How Many Miles Do You Have To Drive To Reset An Evap System?

Drive about 50-100 miles to reset the EVAP system, ensuring all monitors are ready.

Conclusion

Ensuring that your evap and O2 sensors are ready is crucial for passing emissions tests. It’s important to address any underlying issues, such as a weak battery, which can prevent these monitors from being ready. By following the necessary steps and maintaining your vehicle, you can ensure that these systems are functioning optimally.

Why Does My Car Take So Long To Warm Up: Quick Fixes

If your car takes a long time to warm up, it could be due to a faulty thermostat causing inefficient coolant flow. Low coolant levels or a clogged heater core may also be contributing factors.

Ensuring proper thermostat function and maintaining adequate coolant levels are essential for efficient warm-up times. Additionally, addressing issues such as a bad radiator or failing water pump can help improve your car’s heating process, preventing overheating or coolant leaks. Regular maintenance and timely repairs are key to optimizing your vehicle’s heating system and ensuring a comfortable driving experience.

Cold Starts: The Basics

Discover the reason behind your car’s sluggish warm-up process. A potential culprit could be a faulty thermostat affecting the engine’s temperature regulation. Keeping an eye on this component might just be the key to quicker warm-ups.

Inspect Your Thermostat If coolant level is good, thermostat issue could be the cause.
Low Coolant Main source of poor heater output is low coolant level.
Stuck-Open Thermostat A stuck-open thermostat prevents engine from heating up.
Clogged Heater Core Heater core restriction leads to little or no heat output.
Why Does My Car Take So Long To Warm Up: Quick Fixes

Credit: www.maplewoodtoyota.com

Common Culprits For Slow Warm-up

If you are wondering why your car is taking too long to warm up, there could be several reasons. One of the most common culprits is a faulty thermostat. The thermostat regulates the flow of coolant between the engine and the radiator. If it is stuck in the open position, it can prevent the engine from reaching its optimal operating temperature.

Another reason could be low coolant levels or leaks in the cooling system. If the coolant level is low, there is less fuel for the heater core to work with, which can result in poor heater output. Leaks in the system can also cause the coolant to escape, leading to inefficient heating.

It is important to have your car regularly checked by a professional to ensure that these issues are detected and resolved promptly. Neglecting them can cause more serious problems in the long run.

The Role Of The Heater Core

The heater core plays a crucial role in the warming up of your car. It’s a small radiator-like component located under the dashboard. It works by circulating hot coolant from the engine through a small tube in the core. The air from the blower motor is then passed over the core, which warms up and blows hot air into the car’s cabin. However, issues like a clogged heater core or low coolant levels can greatly impact your car’s warming time. A stuck-open thermostat can also prevent the engine from heating up, which will take longer for the car to warm up. It’s important to regularly inspect and maintain these components to ensure your car heats up efficiently.

Why Does My Car Take So Long To Warm Up: Quick Fixes

Credit: blog.napacanada.com

Radiator And Water Pump Problems

When it comes to the question of why your car takes so long to warm up, one possible culprit could be radiator and water pump problems. Signs of a bad radiator include coolant leaks, overheating, and a sweet smell coming from the engine. If your water pump is failing, you may notice coolant leaks, engine overheating, or a whining noise coming from the front of the engine.

Inspecting your thermostat is also important. If your coolant levels are good but your car still takes a while to warm up, your thermostat could be the problem. It is a valve located between the engine and radiator that controls the flow of coolant. A stuck-open thermostat can prevent the engine from heating up properly.

In conclusion, radiator and water pump issues, as well as a faulty thermostat, can contribute to your car taking longer to warm up. It’s important to address these problems to ensure optimal performance and efficiency of your vehicle.

Sensor And Switch Issues

Faulty sensors affecting engine temperature: If your car takes too long to warm up, it could be due to faulty sensors that are providing inaccurate readings to the engine control unit. This can lead to an incorrect fuel mixture, causing the engine to run lean and take longer to reach the optimal temperature.

How switches can mislead your warm-up routine: Switch issues can also contribute to prolonged warm-up times. A malfunctioning switch may not activate the cooling fan at the right time, leading to inefficient heat dissipation and longer warm-up periods.

Effect Of External Conditions

External conditions such as low coolant levels or a faulty thermostat can cause a car to take longer to warm up. A low coolant level reduces the fuel available for the heater core, while a faulty thermostat hinders the engine from heating up efficiently.

These issues can lead to a prolonged warm-up time for the car.

External Conditions
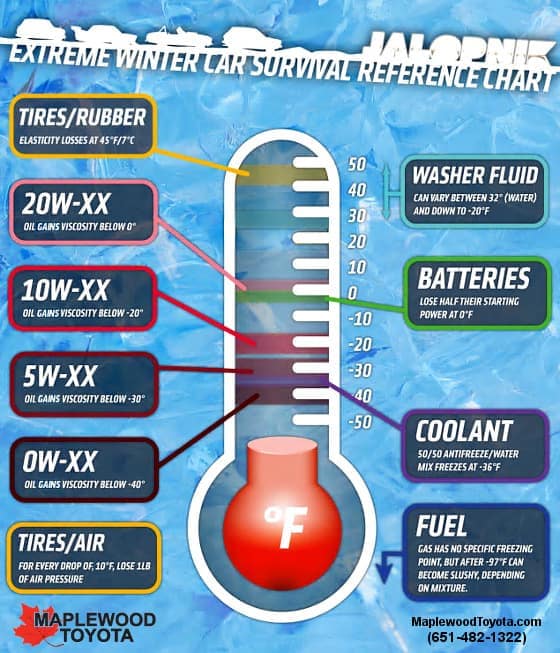
Weather significantly affects engine warm-up time. Cold climates especially prolong this process due to the low temperatures impacting the engine’s ability to reach optimal operating conditions quickly.

Quick Fixes For A Faster Warm-up

If your car takes a long time to warm up, check the thermostat. A faulty thermostat can cause slow warm-up times. Additionally, maintaining the coolant system is crucial. Ensure that the coolant level is adequate and the system is free from leaks. Low coolant levels can lead to poor heater output, while a clogged heater core restricts coolant flow. If your car still takes a while to warm up, a malfunctioning thermostat may be the culprit. The thermostat works with the radiator and coolant to regulate the engine temperature. Addressing these issues can result in a faster warm-up for your vehicle.

Why Does My Car Take So Long To Warm Up: Quick Fixes

Credit: money.cnn.com

When To Seek Professional Help

When your car takes a long time to warm up, it can be a sign of a malfunctioning thermostat. If the coolant level is normal, but the vehicle still struggles to warm up, the thermostat might be the culprit. Another potential issue is a clogged heater core, which can restrict the flow of coolant and reduce the amount of heat produced by the car’s heater. If you’re experiencing these problems, it’s advisable to seek the expertise of a professional mechanic who can diagnose and address complex heating issues. A mechanic’s knowledge and experience can be invaluable in resolving these issues and ensuring your car functions optimally.

Frequently Asked Questions

Why Does My Car Take Longer To Warm Up?

If your car takes longer to warm up, it could be due to a faulty thermostat. The thermostat is a valve located between the engine and radiator that regulates the flow of coolant. If it’s not functioning properly, it can cause the engine to take longer to reach operating temperature.

Make sure your coolant levels are good and consider getting the thermostat checked.

How Can I Get My Car To Warm Up Faster?

To get your car to warm up faster, make sure your coolant levels are good. If they are, the issue could be with your thermostat. A stuck-open thermostat prevents the engine from heating up. Additionally, a clogged heater core restricts coolant flow, giving up little or no heat.

Ensure there is no leakage in the cooling system and check for any faults in the radiator fan, water pump, or coolant hose.

How Long Should It Take For A Car To Warm Up?

It should take around 5-15 minutes for a car to warm up, depending on the outside temperature. If your car is taking longer than that, it could be due to a faulty thermostat or low coolant levels. Make sure to inspect these components to ensure proper heating in your car.

Why Is My Car Not Warming Up Fast Enough?

If your car is not warming up fast enough, check the thermostat for any issues.

Conclusion

If your car takes a long time to warm up, it could be due to a faulty thermostat or low coolant levels. It’s important to inspect these components to ensure proper heating of your vehicle. Additionally, issues such as a bad radiator, failing water pump, or sludge build-up can also contribute to longer warm-up times.

Taking care of these problems will help improve the efficiency and performance of your car’s heating system. Remember to regularly maintain your vehicle to prevent any issues that could affect its warming capabilities.

How Many Miles Can I Drive With 30% Oil Life?

With 30% oil life remaining, you can drive approximately 1,500 miles. The actual mileage may vary based on driving conditions.

When it comes to maintaining your vehicle, understanding the oil life percentage is crucial for ensuring optimal performance and longevity. The oil life indicator is a useful tool that helps you determine when it’s time for an oil change. By knowing how many miles you can drive with a certain oil life percentage, you can plan your maintenance schedule more effectively.

In this blog, we’ll explore the significance of the oil life percentage, factors that affect it, and how to interpret it for your specific driving habits. Understanding this aspect will contribute to the overall well-being of your vehicle and help you make informed decisions regarding oil changes.

Introduction To Oil Life Percentage

Oil Life Percentage: Modern vehicles use sensors to monitor oil quality.

Indicators: The oil life percentage decreases over time and usage.

Driving Distance: Typically, you can drive a few thousand miles with 30% oil life remaining.

Monitoring: Regularly check your oil life percentage for optimal engine performance.

Decoding The 30% Oil Life Reading

When your dashboard displays a 30% oil life reading, it indicates that your oil still has a significant amount of life left. It doesn’t necessarily mean that the oil needs an immediate change. The percentage is a reflection of the oil’s degradation over time and usage. Factors such as driving conditions, mileage, and engine performance contribute to this reading. It’s essential to consider the manufacturer’s recommendations and the type of oil used in your vehicle. Regularly monitoring the oil life percentage and adhering to scheduled oil changes will ensure the longevity and efficiency of your engine.

Calculating Mileage With Remaining Oil Life

With 30% oil life remaining, you can typically drive a few hundred miles more before needing an oil change. Monitoring mileage alongside oil life percentage helps determine when to schedule maintenance. Keeping track of both factors ensures optimal engine performance and longevity.

Calculating Mileage with Remaining Oil Life
Estimating Distance on Remaining Oil Percentage
Variables Affecting Mileage Predictions
When it comes to estimating how many miles you can drive with 30 oil life, it’s important to consider several factors that can affect your mileage predictions. The quality of motor oils, factors that affect oil change intervals, and monitoring oil level are some of the variables that can impact how far you can drive with remaining oil percentage. It’s recommended to avoid the one mistake almost everyone makes with oil change intervals, which is changing the oil too often. Honda’s oil life percentage indicator can provide a guide for when you need an oil change. However, it’s important to note that the indicator is just for your information and not about the actual quality of the oil. At what oil percentage is too low? It depends on the make and model of your vehicle. To determine the optimal time for an oil change, refer to the owner’s manual or consult with a mechanic.
How Many Miles Can I Drive With 30% Oil Life?

Credit: www.reddit.com

The Role Of Driving Habits

Driving habits play a crucial role in determining how many miles you can drive with 30% oil life remaining. By practicing good driving habits such as avoiding aggressive acceleration and braking, maintaining a steady speed, and regular maintenance, you can maximize the mileage you get out of your oil.

The Role of Driving Habits
Impact of Driving Conditions
Driving habits play a significant role in determining how long you can drive with 30 oil life. If you frequently drive in stop-and-go traffic or make short trips, your oil may need to be changed sooner. On the other hand, if you tend to drive long distances on highways, your oil may last longer. Additionally, aggressive driving style, such as rapid acceleration and hard braking, can lead to increased oil consumption and faster degradation of the oil. Therefore, it is important to adjust your driving habits to maximize the life of your oil.

Manufacturer Recommendations Vs. Real World Usage

When it comes to determining how many miles you can drive with 30 oil life, it is important to consider both manufacturer recommendations and real-world usage experiences from vehicle owners. Car manufacturers often provide guidelines for oil change intervals based on factors such as engine design, oil type, and driving conditions. However, it is worth noting that these recommendations may vary and should be followed as a general guideline.

On the other hand, real-world usage experiences from vehicle owners can provide valuable insights into how far you can safely drive with 30 oil life. Many owners report that the oil is still good for several thousand miles more, despite the oil life indicator showing a lower percentage. However, it is important to remember that the oil life indicator is just a reference and does not necessarily reflect the actual quality of the oil.

In conclusion, while manufacturer recommendations provide a starting point, it is important to consider real-world usage experiences and monitor the condition of your oil regularly. This will help ensure that you are driving safely and maintaining the overall health of your vehicle.

How Many Miles Can I Drive With 30% Oil Life?

Credit: www.mobil.com

The Importance Of Regular Maintenance

Regular maintenance of a vehicle is crucial to ensure optimal performance and longevity. The number of miles you can drive with 30% oil life left depends on various factors, such as driving conditions and the type of oil used. It is advisable to consult your vehicle’s manual or a certified mechanic to determine the appropriate oil change intervals.

Regular Maintenance
Scheduled Oil Changes are crucial for engine health.
Delayed oil changes can lead to engine damage.

Understanding Your Vehicle’s Oil Monitoring System

Modern vehicles are equipped with advanced oil monitoring systems that calculate the remaining oil life based on various factors. These systems take into account parameters such as engine temperature, vehicle speed, and operating time to provide a precise estimate of the oil’s condition. As the oil ages and accumulates contaminants, the system accurately calculates the remaining oil life to ensure optimal engine performance and longevity. It’s important to note that the oil life percentage displayed on your vehicle’s dashboard is a reliable indicator of when to schedule your next oil change, helping you maintain your vehicle’s engine in top condition.

How Many Miles Can I Drive With 30% Oil Life?

Credit: www.mobil.com

Faqs On Oil Life And Oil Changes

How Many Miles Can I Drive With 30 Oil Life

When it comes to oil life, it’s common to wonder how many miles can be driven with 30% oil life remaining. The oil life percentage is an estimate of the oil’s remaining useful life based on driving conditions and engine operation. It’s recommended to consider an oil change when the oil life reaches 15-20% to maintain optimal engine performance and longevity. However, the actual mileage can vary depending on individual driving habits and the vehicle’s maintenance history. Regularly monitoring the oil life percentage and adhering to the manufacturer’s guidelines for oil changes can help ensure proper engine lubrication and performance.

Frequently Asked Questions

What Does It Mean When Your Car Says 30% Oil Life?

When your car says 30% oil life, it means that your car’s oil has degraded and only 30% of its quality remains. This indicates that it is time to change your car’s oil soon. It is important to regularly check your car’s oil life percentage to ensure your car’s engine runs smoothly.

What Does 40% Oil Life Mean?

40% oil life means that your engine oil is still in good condition and has about 60% of its life remaining before it needs to be changed. Regularly monitoring the oil life percentage helps ensure optimal engine performance and longevity.

At What Oil Percentage Is Too Low?

Oil should be changed when the oil life percentage is too low, typically below 15%.

How Long Can You Drive On 10% Oil Life?

You can drive on 10% oil life for several thousand more miles, as the indicator is just a reminder, not a quality measure.

Conclusion

The oil life indicator is a helpful tool in determining when to change your engine oil. While it may vary depending on factors such as driving conditions and vehicle make, generally, you can drive a few thousand miles more with 30% oil life remaining.

However, it’s important to note that the indicator is just a reference and not a reflection of the actual quality of the oil. Regular oil changes are still essential to maintain the health and performance of your vehicle.

Oxygen Sensor Heater Monitor Not Ready: Quick Fixes

If the oxygen sensor heater monitor is not ready, it may be due to a weak battery. Consider replacing the battery and re-running the drive cycle.

Ensuring that your vehicle’s oxygen sensor heater monitor is ready is crucial for passing emissions tests. When this monitor is incomplete, it can indicate issues with the battery or the heater circuit of the oxygen sensor. In this blog post, we will explore the reasons behind the oxygen sensor heater monitor not being ready and provide solutions to address this issue.

Understanding the importance of this monitor and taking the necessary steps to ensure its readiness can help you avoid potential complications with your vehicle’s emissions testing and overall performance. Let’s delve into the details to help you resolve the oxygen sensor heater monitor readiness concern effectively.

Introduction To Oxygen Sensor Heater Issues

Oxygen Sensor Heater Monitor Not Ready can cause issues like poor fuel efficiency and emission problems. Incomplete drive cycles can lead to delayed readiness in oxygen sensor heaters. This may result in check engine light illumination and failed emissions tests. It is crucial to address heater circuit problems promptly to avoid costly repairs and vehicle performance issues. Regular monitoring and maintenance of oxygen sensors is essential to ensure optimal engine performance and compliance with emissions standards.

Oxygen Sensor Heater Monitor Not Ready: Quick Fixes

Credit: m.youtube.com

Diagnosing The Problem

To diagnose the problem with the oxygen sensor heater monitor not being ready, there are a few steps you can follow. First, make sure you have the necessary tools and equipment. You will need a multimeter to check resistance and current flow, as well as a battery tester to ensure the battery is not weak.

Start by checking the resistance of the oxygen sensor heater circuit. This can be done by connecting the multimeter to the sensor and checking for the expected resistance value. If the resistance is not within the specified range, the sensor may need to be replaced.

Next, perform a current flow test on the heater circuit. Connect the multimeter in series with the circuit and measure the current flow. Again, compare the measured value to the expected range. If the current flow is not within the specified range, there may be an issue with the circuit or the sensor.

In conclusion, diagnosing the problem with the oxygen sensor heater monitor not being ready requires checking the resistance and current flow of the heater circuit. By following these steps, you can identify any issues and take appropriate action to resolve them.

Understanding Heater Monitor Function

The oxygen sensor heater monitor is a crucial component in emissions control. The PCM monitors the heater by turning the circuit on and off for each sensor. It looks for an expected change in current, evaluating each sensor independently. If the heater monitor is incomplete, it may cause the oxygen sensor monitor not to reset. This can lead to issues with passing emissions tests. Therefore, it’s essential to address any heater monitor readiness issues to ensure proper emissions control.

Oxygen Sensor Heater Monitor Not Ready: Quick Fixes

Credit: www.e46fanatics.com

Quick Fixes For ‘not Ready’ Status

When your vehicle’s Oxygen Sensor Heater Monitor shows a ‘Not Ready’ status, it means that the system has not yet completed its self-diagnostic tests. There are a few quick fixes you can try to resolve this issue.

The first step is to inspect and replace your vehicle’s battery. If your battery is more than four years old, it may be weak and unable to power the Oxygen Sensor Heater Monitor system. A weak battery can cause glitches in the PCM, leading to incomplete diagnostic tests.

The second step is to ensure that you have completed the drive cycle correctly. Make sure you follow the manufacturer’s instructions for the drive cycle and perform it under the correct conditions.

By following these simple steps, you can resolve the Oxygen Sensor Heater Monitor ‘Not Ready’ status and ensure that your vehicle is functioning properly.

Technical Solutions

The Oxygen Sensor Heater Monitor not being ready is a common issue that occurs during emissions testing. To troubleshoot this issue, you can try checking the resistance of the oxygen sensor heater circuit using a multimeter. Alternatively, you can perform a current flow test procedure to evaluate the heater circuit of each oxygen sensor independently. It is important to note that if the oxygen sensor and catalyst monitors are also not ready, it may be due to a weak battery. If your battery is more than four years old, it is recommended to replace it and re-run the drive cycle to ensure the PCM is not hypersensitive to the slightest glitch in the battery.

Oxygen Sensor Heater Monitor Not Ready: Quick Fixes

Credit: wranglertjforum.com

Factors Preventing Monitor Readiness

The oxygen sensor heater monitor may not be ready due to a weak battery, preventing the completion of the drive cycle. It’s crucial to replace the battery if it’s over four years old and rerun the drive cycle to ensure the readiness of the oxygen sensor heater monitor.

Incomplete drive cycles: Ensure all drive cycle conditions are met.
Enabling criteria for sensor heaters: Monitor the PCM for expected current changes.

Resetting The Oxygen Sensor Heater Monitor

Oxygen Sensor Heater Monitor Not Ready

If your oxygen sensor heater monitor is not ready, you can attempt to reset it by following a step-by-step guide. This may involve driving your vehicle through a specific drive cycle to allow the monitor to reset itself. However, if you have attempted the reset process multiple times and the monitor is still not ready, it may be time to consult a professional. A certified mechanic or automotive technician can diagnose the issue and determine if there are underlying problems causing the monitor to remain incomplete. Seeking professional assistance can help ensure that any issues related to the oxygen sensor heater monitor are properly addressed, potentially saving you time and frustration in the long run.

Preventative Measures And Maintenance

Routine checks play a crucial role in ensuring the optimal function of the oxygen sensor heater monitor. Regularly inspect the sensor for any signs of damage or wear and tear. In addition, it is important to adhere to the replacement intervals recommended by the manufacturer to maintain the efficiency of the sensor. By following these measures, you can prevent potential issues and ensure that the oxygen sensor heater monitor remains in good working condition.

Troubleshooting Specific Vehicles

The Oxygen Sensor Heater Monitor Not Ready can be a common issue when troubleshooting specific vehicles. If the oxygen sensor and catalyst monitors are also not ready, it may indicate a weak battery. It is recommended to replace the battery and rerun the drive cycle to resolve this problem.

Chevy Silverado BMW Ford Focus ST
Check the oxygen sensor and catalyst monitors for readiness. Ensure the battery is in good condition for a successful drive cycle. Monitor the oxygen sensor heater to detect any issues.
Verify the current flow through the oxygen sensor heater circuit. Address any incomplete oxygen sensor heater monitor concerns promptly. Seek professional help if the oxygen sensor heater won’t reset.

Legal And Environmental Considerations

Emission regulations compliance is a legal requirement that all vehicles must adhere to. One important aspect of emission regulations compliance is passing the smog and emissions testing. However, if the oxygen sensor heater monitor is not ready, it can negatively impact the results of the testing.

The oxygen sensor heater monitor is responsible for monitoring the PCM’s heater strip circuit and evaluating the current flow through the heater circuit of each oxygen sensor independently. If the enabling criteria to complete the oxygen sensor heater monitor do not occur, the heater monitor goes uncompleted for several reasons.

If your oxygen sensor and catalyst monitors are also not ready, the reason could be a weak battery. If your battery is more than four years old, replace it and re-run the drive cycle. Even though your car may start just fine, the PCM is hypersensitive to the slightest glitch in the battery.

Concluding Thoughts

Incomplete readiness of the oxygen sensor heater monitor may indicate a potential issue with the battery. Consider replacing an older battery and rerunning the drive cycle to address the problem effectively. Regular maintenance ensures the PCM functions optimally for emissions compliance.

Summary of Solutions:
1. Check the battery: If your battery is weak, it can cause the oxygen sensor heater monitor to not be ready. Replace the battery and re-run the drive cycle.
2. Check the oxygen sensor heater circuit: If the circuit is faulty, it can cause the oxygen sensor heater monitor to not be ready. Check the resistance and current flow through the heater circuit.
3. Check for other monitors: If the oxygen sensor and catalyst monitors are also not ready, it may indicate a larger issue with the vehicle’s emissions system.
It is important to address the issue of the oxygen sensor heater monitor not being ready in a timely manner. Not only can it cause your vehicle to fail emissions tests, but it can also lead to larger issues with the vehicle’s performance. By following the above solutions and ensuring that the drive cycle is completed correctly, you can ensure that your vehicle is running efficiently and meeting emissions standards.
The oxygen sensor heater monitor is an important component of a vehicle’s emissions system. If it is not ready, it can cause the vehicle to fail emissions tests and lead to larger issues with the vehicle’s performance. To address this issue, it is important to check the battery, oxygen sensor heater circuit, and other monitors. By replacing the battery, checking the circuit’s resistance and current flow, and ensuring that other monitors are functioning properly, you can ensure that your vehicle is running efficiently and meeting emissions standards. Timely repairs are crucial to prevent further damage to the vehicle.

Frequently Asked Questions

How To Get An O2 Heater Monitor Ready?

To get an O2 heater monitor ready, ensure the battery is in good condition. Replace if over four years old and rerun the drive cycle.

Why Is My Oxygen Sensor Monitor Not Ready?

If your oxygen sensor monitor is not ready, it could be due to a weak battery. Replace the battery if it is more than four years old and rerun the drive cycle. The PCM is sensitive to even slight battery glitches.

What Is The Oxygen Sensor Heater Monitor?

The oxygen sensor heater monitor evaluates the heater circuit for each sensor to ensure proper function.

How Long Does It Take For An O2 Sensor To Be Ready?

It typically takes about 30-50 miles of driving for an O2 sensor to be ready.

Conclusion

If you are experiencing the issue of the oxygen sensor heater monitor not being ready, it is important to check the battery of your vehicle. A weak battery could be the culprit behind this problem. If your battery is more than four years old, it is recommended to replace it and re-run the drive cycle.

Remember, even a slight glitch in the battery can affect the performance of the PCM. By following these steps, you can resolve the oxygen sensor heater monitor issue and ensure your vehicle is running efficiently.