Fuel System Not Ready Inspection: Quick Pass Tips

To ensure a fuel system is ready for inspection, the best approach is to drive the car as the monitors are self-check routines. By driving the car, the monitors will have a chance to complete the necessary checks and become ready for inspection.

This process allows the vehicle’s computer to check all parts of the emissions control system for any potential issues. It is important to note that a “not ready” result indicates that the vehicle’s computer has not yet checked all the necessary components, and further driving may be required for the system to become ready.

Additionally, pending codes can also prevent readiness monitoring. However, driving alone will not typically cause the fuel system to become ready, as a pending code can halt the process.

Introduction To Fuel System Readiness

During a fuel system not ready inspection, it is important to ensure that all monitors are self-checking. One of the best ways to achieve this is by driving the car to allow the monitors to complete their checks.

Introduction to Fuel System Readiness
Understanding ‘Not Ready’ Status
Importance for Emission Inspections
Fuel System Not Ready Inspection can lead to emission test failures. Understanding the ‘Not Ready’ status is crucial. Importance for emission inspections can’t be overstated. Inspecting the fuel system readiness is essential for vehicle compliance. Regular monitoring ensures a smooth inspection process. Addressing readiness issues promptly is key. Proper maintenance enhances fuel system performance.
Fuel System Not Ready Inspection: Quick Pass Tips

Credit: www.golfmk7.com

Common Reasons For ‘not Ready’ Status

When it comes to getting your fuel system monitor ready for inspection, driving the car is the best way to do it. However, there are some common reasons why your monitor may show a ‘Not Ready’ status. One reason is pending trouble codes, which can stop the readiness monitoring process. Another reason is incomplete drive cycles, where the car hasn’t been driven enough for the monitor to complete its self-check routine. It’s important to note that a ‘Not Ready’ status doesn’t necessarily mean there’s something wrong with your fuel system. Clearing any pending trouble codes and completing several drive cycles can often resolve the issue and get your monitor ready for inspection.

Preparing For Inspection

When preparing for a fuel system not ready inspection, there are some essential pre-check steps that you should follow. These steps will help ensure that your vehicle’s fuel system is ready for inspection. One important step is to use diagnostic tools effectively. Diagnostic tools can provide valuable information about the fuel system and help identify any potential issues. By using these tools properly, you can diagnose and address any problems before the inspection. Additionally, it is recommended to drive the car to get the monitors ready. Monitors are self-check routines that need to be completed in order to pass the inspection. Driving the car allows the monitors to run and complete their checks. By following these pre-check steps and using diagnostic tools effectively, you can increase the chances of passing the fuel system not ready inspection.

Fuel System Not Ready Inspection: Quick Pass Tips

Credit: f10.m5post.com

Drive Cycle Basics

Drive Cycle Basics:

When it comes to drive cycle basics, it is important to understand what constitutes a drive cycle and how to achieve a complete drive cycle. A drive cycle is a set of operating conditions that need to be met in order for the vehicle’s onboard diagnostic system to complete its self-tests. These tests are essential for the readiness monitors to be set to “ready” status. Achieving a complete drive cycle involves driving the vehicle under specific conditions such as steady highway speeds, stop-and-go city driving, and idling. It is important to follow the manufacturer’s recommended drive cycle procedure to ensure that all necessary tests are completed.

Tips To Expedite Readiness

To expedite readiness for the fuel system not ready inspection, drive the car to allow the monitors to self-check and become ready. Use a VAG capable scan tool to check fuel trims and address any issues to ensure readiness for the inspection.

Tips to Expedite Readiness
  • Drive the car to get the monitors ready as they are self-check routines.
  • Consider your driving patterns for success in getting the fuel system monitor ready.
  • Take into account the electrical load when trying to get the fuel system ready.
Getting a fuel system monitor ready for an inspection can be a daunting task. One of the best ways to expedite readiness is by driving the car to get the monitors ready as they are self-check routines. When considering your driving patterns for success, take into account the electrical load as well. It is important to note that a pending code can stop the readiness monitoring process, and no amount of driving will typically cause the fuel system to become ready/clear/pass. However, if the fuel trims are high, then you will need to figure out why. In most cases, just the monitor not being ready should not cause an inspection failure.
Fuel System Not Ready Inspection: Quick Pass Tips

Credit: www.youtube.com

Troubleshooting Common Issues

Fuel System Not Ready Inspection
Troubleshooting Common Issues
Fuel Trims and Their Impact

When dealing with persistent ‘Not Ready’ status, it’s crucial to understand the impact of fuel trims. High fuel trims indicate potential issues that need investigation. Using a VAG capable scan tool can help diagnose the problem accurately. Incomplete fuel system monitoring is often caused by pending codes, halting the readiness process. To pass emissions tests, it’s essential to ensure the fuel system is ready for inspection. Taking proactive steps to clear codes and resolve underlying problems is key to achieving a ‘Ready’ status.

State-specific Guidelines

Fuel System Not Ready Inspection can vary based on State-Specific Guidelines. Understanding local emission standards is crucial for passing inspections. For instance, in NJ, issues with the fuel system can result in a “Not Ready” error, impacting the inspection. Similarly, car models such as Ford, Chevy, Mercedes, and Hyundai may have different requirements for fuel system readiness. It’s essential to be aware of the specific guidelines for each state and vehicle make to ensure compliance with the local emission standards.

After The Inspection

After the Inspection: If your fuel system is not ready after the inspection, there are a few post-inspection steps you can take. First, check the vehicle’s manual to ensure you have followed all the necessary procedures. Make sure that the fuel tank is between 1/4 and 3/4 full, as extreme levels can affect the readiness. Additionally, ensure that the vehicle has been driven under various conditions, including both highway and city driving, to allow the system to complete its checks. If after all these steps the system is still not ready, it may be time to seek professional help to diagnose and rectify any underlying issues.

Resources And Assistance

For assistance with the “Fuel System Not Ready” inspection, you can rely on available resources in Austin, Texas. By following self-check routines and driving the car, you can ensure that the fuel system monitors are ready for inspection. Additionally, you can consult VAG capable scan tools to check fuel trims and address any issues that may arise.

For resources and assistance:
– Online Forums and Communities: Engage with car enthusiasts online to troubleshoot fuel system issues.
– Governmental and Environmental Resources: Access official guides for emission control system checks and solutions.

Frequently Asked Questions

How Do I Get My Fuel System Monitor Ready?

The best way to get your fuel system monitor ready is to drive your car. Monitors are self-check routines and driving allows them to complete their checks. If you’re having trouble passing an inspection, you may need to use a VAG capable scan tool to check your fuel trims and figure out why they’re high.

Avoid any pending codes that could stop the readiness monitoring process.

How Long Does It Take For The Evap System To Be Ready?

To get the EVAP system ready, drive the car until the monitors complete the self-check routine.

How Long Does It Take For Readiness Monitors To Reset?

Readiness monitors typically reset after driving for 50-100 miles under various conditions.

How Many Are Not Ready To Pass The Nj Inspection?

Around 10% of vehicles are not ready to pass the NJ inspection.

Conclusion

Ensuring that your fuel system is ready for inspection is crucial for passing emissions tests. By addressing any pending codes and using a VAG capable scan tool to check fuel trims, you can identify and resolve issues. Driving the car can also help prepare the monitors for inspection.

Regular maintenance and attention to the fuel system can help avoid “Not Ready” errors.

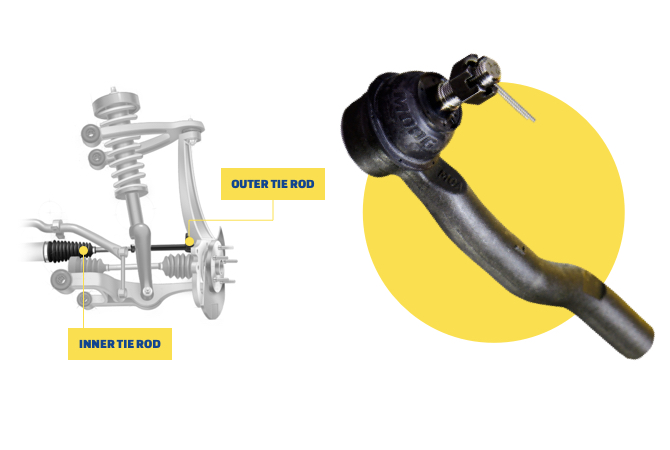
How Long Can You Drive On A Bad Tie Rod: Risks & Limits

Driving on a bad tie rod is extremely risky. If a tie rod completely fails, steering control is lost immediately.

It is unsafe to drive with a worn tie rod due to the potential for a catastrophic steering failure. Neglecting tie rod issues can lead to loss of vehicle control and accidents. Timely inspection and repair are crucial for safe driving.

Remember, safety should always come first when it comes to vehicle maintenance. It is recommended to address any steering or suspension problems promptly to ensure safe and efficient driving conditions. Don’t take chances with your safety on the road.

Introduction To Tie Rods

Driving on a bad tie rod can be dangerous. If a tie rod fails completely, steering control is lost, risking a serious accident. It’s crucial to address any signs of wear promptly to ensure safe driving conditions.

Introduction to Tie Rods Role in Steering and Suspension
Tie rods are crucial components that help control the movement of the wheels. Consequences of Tie Rod Failure
Steering and suspension rely on tie rods to maintain stability and smooth operation. Driving with a worn tie rod can lead to loss of steering control and potential accidents.
Symptoms of a bad tie rod include vibrations while driving and uneven tire wear. Neglecting tie rod maintenance can result in complete steering failure.

Identifying Bad Tie Rod Symptoms

When it comes to driving, it is important to ensure that the car’s steering and suspension systems are in good condition. One of the critical components of the steering system is the tie rod. A bad tie rod can cause serious safety concerns while driving. Here are some symptoms that indicate a bad tie rod:

  • Steering Wheel Free Play: If you notice that the steering wheel has excessive play, it means that the tie rod is loose, causing the steering wheel to move without affecting the car’s direction.
  • Vibrations and Uneven Tire Wear: Bad tie rods can cause vibrations in the steering wheel, and also lead to uneven tire wear.
  • Suspicious Noises: Clunky or creaky noises while driving, especially when turning, can indicate a bad tie rod.

If you experience any of these symptoms, it is essential to get your car inspected by a professional mechanic immediately to avoid any potential accidents on the road.

Tie Rod Failure Risks

Driving on a bad tie rod is extremely risky and can lead to loss of steering control. If a tie rod fails completely, the wheel can break free from the steering assembly, making the vehicle impossible to steer. It’s crucial to address any signs of wear on the tie rods immediately to ensure safe driving conditions.

SYMPTOMS OF A BAD TIE ROD
Purpose of the Tie Rods Helps steering in a straight line
Steering Wheel Free Play Loose steering wheel
Vibration while Driving Shaking in the steering wheel
Uneven Tire Wear Tire wear on one side or the other
Hearing a Clunky Noise Noise coming from the steering system
Have a Creaky Noise When Going Over Bumps Noise coming from the suspension system
Driving on a bad tie rod is a dangerous situation that can lead to a loss of steering control and potential accidents. In the worst-case scenario, a tie rod completely fails and the wheel breaks free of the steering assembly, causing the vehicle to lose the ability to steer. The first sign of any wear to the tie rods indicates that steering is already at risk, and the vehicle is not safe to drive. A loose tie rod is a major safety concern because if it falls off, you will lose control over your vehicle entirely. It can also cause front suspension problems and excessive tire wear if not maintained. If you suspect a bad tie rod, it’s important to have it inspected and repaired by a professional mechanic as soon as possible.

Driving With A Compromised Tie Rod

Driving with a compromised tie rod is extremely dangerous as it can result in a loss of steering control. If a tie rod is worn or broken, it is not safe to drive the vehicle. It is important to address any issues with the tie rod immediately to ensure the safety of yourself and others on the road.

Driving with a Compromised Tie Rod
Short-term Maneuverability
Driving with a bad tie rod can have immediate effects on your vehicle’s maneuverability. Symptoms such as steering wheel free play, vibrations while driving, uneven tire wear, and clunky or creaky noises can make it difficult to control your vehicle properly. These issues can affect your ability to navigate turns, maintain stability, and respond to sudden changes in traffic conditions. It is crucial to address these problems promptly to ensure your safety on the road.
Long-term Damage and Safety Concerns
Continuing to drive with a bad tie rod can lead to long-term damage and pose serious safety risks. If a tie rod fails completely, the wheel can break free from the steering assembly, causing a loss of steering control. This scenario is extremely dangerous and can result in accidents. Additionally, worn tie rods can also lead to front suspension issues and excessive tire wear. It is essential to prioritize regular maintenance and promptly address any signs of wear or damage to prevent further complications.

Assessing The Severity Of Damage

When it comes to assessing the severity of damage, a visual inspection is crucial. Look for uneven tire wear, vibration while driving, and hearing a clunky noise. Professional evaluation is also recommended to accurately determine the extent of the issue.

How Long Can You Drive On A Bad Tie Rod: Risks & Limits

Credit: www.quora.com

Immediate Actions Upon Tie Rod Damage

Safe Driving Practices: Seek immediate repairs if tie rod damage is suspected to prevent steering failure.

Driving with a bad tie rod increases safety risks and may lead to loss of control.

Ignoring tie rod issues can result in complete steering failure and potential accidents.

Regularly check for symptoms of bad tie rods and address any concerns promptly.

Maintenance To Prevent Tie Rod Wear

Proactive Component Replacement: Regularly inspecting and replacing tie rods is crucial for vehicle safety. Worn tie rods can lead to steering instability and even loss of control. As a preventive measure, it’s advisable to replace tie rods in pairs to ensure balanced steering. Routine inspections should be conducted to check for any signs of wear or damage, such as excessive play or unusual noises. Addressing these issues promptly can prevent further damage and ensure safe driving. Power steering fluid leaks and uneven tire wear are also indicators of potential tie rod problems, warranting immediate attention. Protective boot and jam nut inspection are essential for maintaining tie rod integrity and preventing premature failure. When it comes to vehicle safety, proactive maintenance is key to preventing tie rod wear and ensuring a smooth driving experience.

How Long Can You Drive On A Bad Tie Rod: Risks & Limits

Credit: www.autonationmobileservice.com

Conclusion: The Imperative Of Timely Repairs

Driving on a bad tie rod can lead to uneven tire wear, steering wheel vibrations, and clunky noises. Neglecting tie rod maintenance can jeopardize road safety and result in costly repairs. If a tie rod fails completely, it can cause the loss of steering control, posing a significant safety risk. Continuing to drive with a worn tie rod can exacerbate the problem and lead to front suspension issues. When a tie rod breaks, it is imperative to seek immediate repairs to ensure vehicle operability. Regular inspection and timely maintenance of tie rods are essential for ensuring road safety and preventing costly damages.

How Long Can You Drive On A Bad Tie Rod: Risks & Limits

Credit: www.moogparts.com

Frequently Asked Questions

What Happens If You Keep Driving On A Bad Tie Rod?

Driving on a bad tie rod can be extremely dangerous and can lead to a complete failure of the steering assembly. This can cause the wheel to break free and the vehicle to lose the ability to steer. It is not safe to drive a car with worn steering and suspension parts, and should be repaired immediately at the first sign of wear to the tie rods.

How Urgent Is A Loose Tie Rod?

Driving with a loose tie rod is a major safety concern as it can cause the wheel to break free, resulting in a loss of steering control. Even if it doesn’t fail completely, it can lead to front suspension problems and excessive tire wear.

It is not safe to drive a vehicle with a loose tie rod, and immediate attention from a professional mechanic is required.

What To Do If A Tie Rod Breaks While Driving?

If a tie rod breaks while driving, safely pull over and have the vehicle towed for immediate repair.

Can You Drive With Seized Tie Rods?

Driving with seized tie rods is extremely dangerous and should be avoided at all costs. If a tie rod completely fails, the wheel can break free from the steering assembly, causing a loss of steering control. Even if there are signs of wear, it is not safe to drive the vehicle.

It is recommended to have the tie rods repaired or replaced immediately to ensure safe driving.

Conclusion

Driving with a bad tie rod poses significant safety risks and can lead to loss of steering control. It’s crucial to address any signs of tie rod wear promptly to avoid potential accidents and damage to the vehicle. Regular maintenance and timely repairs can ensure a safe and smooth driving experience.

Fuel System Monitor Incomplete: Quick Fix Guide

The Fuel System Monitor Incomplete indicates that the fuel control system is not ready for evaluation by the PCM (Powertrain Control Module). To make the fuel monitor ready, ensure that the MIL (Malfunction Indicator Light) is not on, have enough fuel in the car, and complete a drive cycle.

The fuel system monitor allows the PCM to assess how effectively the fuel control system can regulate the fuel mixture to achieve an optimal air/fuel ratio in the combustion chamber across different engine RPM and load ranges. This monitor is essential for evaluating the performance of the fuel delivery system.

It typically takes a few days of normal driving for the monitors to be ready.

Introduction To Fuel System Monitor Issues

Ensure Fuel System Monitor is complete by following these steps: Confirm no MIL light, maintain adequate fuel levels, and complete a drive cycle for optimum air/fuel ratio evaluation.

Common Symptoms of Incomplete Fuel System Monitor Potential Risks of Ignoring the Problem
– Check engine light illuminated
– Reduced fuel efficiency
– Engine misfires
– Engine damage
– Reduced performance
– Failed emissions test
Fuel System Monitor Incomplete issues can lead to serious consequences. Ignoring these symptoms can result in engine damage, decreased performance, and even failing emissions tests. It is crucial to address incomplete fuel system monitor problems promptly to avoid costly repairs and ensure optimal vehicle performance. Regular maintenance and timely diagnosis are essential to prevent further complications.
Fuel System Monitor Incomplete: Quick Fix Guide

Credit: www.aa1car.com

Understanding Obd-ii And Fuel System Monitoring

Fuel System Monitor Incomplete

Fuel System Monitor Incomplete occurs when the OBD-II system is unable to complete the fuel system monitoring process. The role of OBD-II in vehicle diagnostics is crucial as it helps in identifying potential issues with the fuel system. The Fuel System Monitor evaluates the fuel control system’s ability to regulate the fuel mixture for optimal air/fuel ratio. It assesses this throughout various engine rpm and load ranges. To ensure the monitor is ready, the car should not have the MIL commanded on, must have sufficient fuel, and complete the drive cycle. Typically, a few days of normal driving will make the monitors ready. It is essential to resolve any issues causing the fuel system monitor to indicate a malfunction.

Primary Causes Of Incomplete Fuel System Monitors

Incomplete fuel system monitors can be caused by several factors. Some common reasons include a malfunctioning fuel delivery system, insufficient fuel in the vehicle, or not completing the required drive cycle. It is important to address these issues to ensure the fuel system monitor is ready for inspection.

The incomplete fuel system monitor can be caused by malfunctioning sensors that impact the fuel control system’s ability to regulate the fuel mixture. It is important to ensure that the MIL is not commanded on and that there is enough fuel in the car. Completing the “drive cycle” can also help make the monitors ready. The fuel system monitor evaluates how well the fuel control system can regulate the fuel mixture to achieve an optimum air/fuel ratio throughout varying engine rpm and load ranges. The monitor executes continuously under normal engine operating and driving conditions, providing there are no DTCs present and the EVAP system is operating.

Pre-diagnostic Checks

Before starting the pre-diagnostic checks for a fuel system monitor incomplete issue, make sure that the Malfunction Indicator Light (MIL) is not commanded on. This is the first step in ensuring that the fuel monitor is ready. Secondly, ensure that there is enough fuel in the car. This is important since a low fuel level can cause the fuel monitor to be incomplete. Lastly, complete the so-called “drive cycle”. This involves driving the car under specific conditions and for a specific period to allow the fuel system monitor to reset. Typically, a few days of normal driving, both city and highway, will make the monitors ready. However, if a specific drive cycle is not known, a universal drive cycle can be used as a guideline to reset the monitors.

Drive Cycle Procedures To Reset Monitors

To reset the incomplete fuel system monitor, ensure that the MIL is not on, have enough fuel, and complete a drive cycle. This will allow the PCM to evaluate the fuel control system and achieve an optimal air/fuel ratio in the combustion chamber.

To reset the monitors for the fuel system monitor incomplete issue, there are a few drive cycle procedures that you can follow. The first step is to ensure that the MIL (Malfunction Indicator Light) is not illuminated. Next, make sure that your vehicle has enough fuel. Then, you can proceed with the generic drive cycle, which involves a combination of city and highway driving. If you don’t have access to a specific drive cycle for your vehicle, this generic drive cycle can be used as a guideline. It usually takes a few days of normal driving for the monitors to be ready. The fuel system monitor evaluates how well the fuel control system can regulate the fuel mixture to achieve an optimal air/fuel ratio in the combustion chamber. By following these steps, you can reset the monitors and address the fuel system monitor incomplete issue.

Troubleshooting Tips For Persistent Issues

  • Ensure MIL is off.
  • Confirm adequate fuel levels.
  • Complete drive cycle.

Fuel system monitor evaluates fuel control for optimal air/fuel ratio.

OBD-II monitors examine fuel delivery functionality.

Monitors usually ready after city and highway driving for a few days.

Drive cycle guidelines help in resetting monitors without specific instructions.

Professional help may be needed if issues persist despite troubleshooting.

Preventive Measures And Maintenance Tips

Regular check-ups and maintenance of sensors are crucial for ensuring the proper functioning of the fuel system. It is important to regularly inspect the fuel system components for any signs of wear or damage. Cleaning and replacing sensor components as per the manufacturer’s recommendations is essential to maintain the accuracy of fuel monitoring.

Additionally, timely calibration of fuel system sensors can significantly enhance the overall performance and efficiency of the system. It is recommended to adhere to the recommended maintenance schedule provided by the vehicle manufacturer to ensure optimal functioning of the fuel system.

Fuel System Monitor Incomplete: Quick Fix Guide

Credit: f30.bimmerpost.com

Legal And Environmental Considerations

Fuel System Monitor Incomplete can have legal and environmental repercussions. Adhering to emission standards and undergoing smog checks is essential. Driving with an incomplete fuel system monitor can lead to potential consequences, including failing emissions tests and environmental impact.

Fuel System Monitor Incomplete: Quick Fix Guide

Credit: www.reddit.com

Frequently Asked Questions

How To Make A Fuel Monitor Ready?

To make a fuel monitor ready, first make sure the MIL (Malfunction Indicator Light) is not on. Next, ensure that there is enough fuel in the car. Finally, complete the drive cycle. Typically, a few days of normal driving, both city and highway, will make the monitors ready.

What Is The Fuel System Monitor?

The fuel system monitor allows the PCM to evaluate the fuel control system’s effectiveness in maintaining an optimal air/fuel ratio throughout various engine conditions. It helps ensure efficient combustion and reduced emissions. Regular driving will typically make the monitor ready for inspection.

What Causes The Fuel System Monitor To Indicate A Malfunction?

A malfunction in the fuel system monitor can be caused by issues like a faulty sensor or fuel pump.

How Long Does It Take Obd Monitors To Be Ready?

OBD monitors typically take a few days of normal driving to become ready. Follow a generic drive cycle if a specific one is unknown.

Conclusion

Ensuring the fuel system monitor is complete is crucial for passing smog tests. Remember to check the MIL status, fuel levels, and complete a drive cycle. With a few days of regular driving, the monitors should be ready. Following a generic drive cycle can help reset the monitors when a specific one is not available.

How to Get Htr Monitor Ready: Quick & Efficient Tips

To get the HTR monitor ready, start the vehicle cold and let it warm up while applying the headlights, heater, and rear defrost. This will help the monitor to go ready and ensure proper functioning of the oxygen sensor heater.

It is important to have the HTR monitor ready to maintain engine efficiency and reduce vehicle emissions. Additionally, a weak battery can affect the readiness of the oxygen sensor and catalyst monitors, so if the monitors are not ready, it may be necessary to replace the battery and re-run the drive cycle.

How to Get Htr Monitor Ready: Quick & Efficient Tips

Credit: www.reddit.com

Introduction To Htr Monitor Readiness

Getting HTR monitor ready is crucial to ensure proper vehicle operation and reduce emissions. Follow the recommended drive cycle and check for weak battery or faulty oxygen sensor if the monitor is not ready.

HTR Monitor Ready Essentials
– Understanding the significance of HTR Monitor in vehicle emissions testing.
– How the Oxygen Sensor Heater Monitor impacts engine efficiency and emission levels.
– Steps to ensure your OBD monitor is ready for emissions testing.
Drive Cycle Insights
– Troubleshooting tips for Oxygen Sensor Monitor and EVAP System readiness.
– Quick fixes for issues with HTR Monitor and Fuel System Monitor readiness.

Understanding Obd Systems

Understanding OBD Systems:

Basics of OBD:

The HTR monitor, short for Oxygen Sensor Heater Monitor, is an important component of the OBD system. When a vehicle is running in an open loop, the computer ignores the oxygen sensor signal for air/fuel mixture corrections. This results in low engine efficiency and increased vehicle emissions.

Getting the HTR monitor ready is crucial for passing emissions tests. If the oxygen sensor and catalyst monitors are also not ready, it is likely due to a weak battery. If your battery is more than four years old, it is recommended to replace it and re-run the drive cycle.

It is important to note that the HTR monitor is usually the first to go ready. To ensure its readiness, start the vehicle cold and apply the headlights, heater, and rear defrost, allowing it to warm up.

By following these steps and addressing any issues with the HTR monitor, you can ensure your vehicle is ready for emissions testing.

Identifying Htr Monitor Issues

When dealing with HTR monitor issues, it’s essential to understand the common error messages that may arise. Look out for any symptoms of HTR monitor problems, such as the oxygen sensor signal being ignored by the computer during open-loop operation. This can lead to decreased engine efficiency and increased vehicle emissions. Additionally, if the oxygen sensor and catalyst monitors are not ready, it could indicate a weak battery. To address these issues, consider replacing the battery and rerunning the drive cycle. It’s crucial to complete the EVAP emissions monitor as well. By addressing these key areas, you can ensure that the HTR monitor is ready for emission inspections.

How to Get Htr Monitor Ready: Quick & Efficient Tips

Credit: xoutpost.com

Preparation Steps For Htr Readiness

Battery health check

Before starting the HTR readiness preparation, make sure to check your vehicle’s battery health. If the battery is weak or more than four years old, replace it and re-run the drive cycle. The PCM is hypersensitive to the slightest glitch in the battery, and a weak battery can cause the oxygen sensor and catalyst monitors to not be ready.

Initial vehicle setup

For the initial vehicle setup, start the vehicle cold and let it idle for 2 minutes. Then drive the vehicle at 25 mph for 2 minutes and 40-60 mph for 8 minutes. Apply the headlights, heater, and rear defrost and let it warm up. These steps will help the HTR monitor to go ready.

Note: The above HTML table represents the preparation steps for HTR readiness including battery health check and initial vehicle setup.

Drive Cycle Protocols

Oxygen Sensor Heater Monitor (HTR) is an important component of the vehicle’s emission control system. When the vehicle is running in an open loop, the computer ignores the oxygen sensor signal for air/fuel mixture corrections. This results in low engine efficiency and the production of more vehicle emissions. To get the HTR monitor ready, you need to follow the standard drive cycle procedure. This procedure involves driving the vehicle in different conditions and at different speeds to allow the computer to run various tests and set the monitors to ready status. You can also follow the HTR-specific drive cycle for some vehicles. If the oxygen sensor monitor or catalyst monitor is also not ready, the culprit may be a weak battery. Replace the battery if it is more than four years old and re-run the drive cycle.

Quick Fixes For Htr Readiness

Get your HTR monitor ready with these quick fixes. Ensure your oxygen sensor heater monitor and catalyst monitors are ready for optimal engine efficiency and reduced emissions. If your battery is weak, replace it and re-run the drive cycle.

Quick Fixes for HTR Readiness
Troubleshooting tips
To ensure HTR monitor readiness, try these steps: – Check oxygen sensor status. – Verify catalyst monitor readiness. – Address weak battery issues. – Complete drive cycle for EVAP system. – Understand OBD II readiness monitors. – Follow heater drive cycle for HTR. – Get emission inspection with HTR not ready. – Resolve HTR icon queries in emissions system. – Seek solutions for EVAP and O2 sensor readiness. – Learn how to fix HTR code effectively. – Prepare oxygen sensor monitor for readiness. – Troubleshoot oxygen sensor heater monitor concerns. – Ensure EVAP monitor readiness for GM vehicles. – Get fuel system monitor ready for optimal performance.

Advanced Solutions For Stubborn Htr Issues

Professional diagnostic tools: When dealing with stubborn HTR issues, it’s crucial to have access to professional diagnostic tools. These tools can help pinpoint the exact cause of the problem, allowing for a more targeted and effective solution.

When to seek a mechanic’s help: If you’ve tried various methods to get your HTR monitor ready without success, it may be time to seek the expertise of a mechanic. A professional can provide insights and solutions that may not be readily available to the average car owner.

How to Get Htr Monitor Ready: Quick & Efficient Tips

Credit: www.amazon.com

Maintaining Htr Monitor Health

To ensure the HTR monitor is ready, start the vehicle cold, use the headlights, heater, and rear defrost to warm it up. This will help the oxygen sensor heater monitor go ready and improve engine efficiency during open-loop operation. After these steps, the HTR monitor should be ready for an emission inspection.

To maintain HTR monitor health, conduct routine checks and maintenance.
Implement preventive measures to ensure proper functioning of the monitor.
Check oxygen sensor and catalyst monitors if HTR monitor is not ready.
Replace weak battery if necessary to resolve monitor readiness issues.
Complete drive cycle to activate EVAP system and ensure monitor readiness.

Navigating Emission Inspections

Navigating emission inspections can be a daunting task, especially when it comes to getting the HTR monitor ready. Learn how to ensure your vehicle’s oxygen sensor heater monitor is prepared for the inspection process in Austin, Texas, and avoid any issues with vehicle emissions.

Inspection prerequisites Before navigating emission inspections, it’s crucial to ensure that the HTR monitor is ready. The HTR (Oxygen Sensor Heater Monitor) plays a key role in regulating the air/fuel mixture, directly impacting emissions. To proceed with the inspection, it’s imperative that the HTR monitor is in the ready state.
Dealing with HTR monitor not ready If the HTR monitor is not ready, it’s essential to address the underlying issues promptly. Start by checking the vehicle’s battery, as a weak battery can prevent the readiness of the HTR monitor. If the battery is older than four years, consider replacing it. Additionally, ensure that the vehicle undergoes a complete drive cycle to facilitate the readiness of the HTR monitor.

Frequently Asked Questions

What Does Htr Mean On A Code Reader?

HTR on a code reader stands for Oxygen Sensor Heater Monitor. It is ignored by the computer during open-loop operation.

How Do I Get My Obd Monitor Ready?

To get your OBD monitor ready, ensure your vehicle is properly maintained and driven according to manufacturer guidelines.

Why Is My Oxygen Sensor Monitor Not Ready?

Your oxygen sensor monitor may not be ready due to a weak battery. If the battery is over four years old, consider replacing it and re-running the drive cycle. A weak battery can affect the performance of the vehicle’s emission system monitors.

How Long Does It Take For The Evap System To Be Ready?

The evap system typically takes about 1-2 driving cycles to be ready. It is important to drive the vehicle under various conditions, including both city and highway driving, to allow the system to complete its self-checks. Make sure there are no pending trouble codes and that the fuel tank is between 1/4 and 3/4 full.

Conclusion

Preparing your HTR monitor is essential for passing emissions tests and ensuring optimal engine performance. By following the proper drive cycle and addressing any underlying issues, you can successfully get your oxygen sensor heater monitor ready. Keep in mind the importance of a well-maintained vehicle for both environmental and operational reasons.

Gm Catalyst Monitor Drive Cycle: Quick Pass Tips

To complete a GM Catalyst Monitor Drive Cycle, follow specific driving steps provided by the manufacturer. This ensures the catalyst monitor runs correctly for emissions testing.

By following a series of driving conditions such as cold start, idle, acceleration, and deceleration, the catalyst monitor can be reset effectively. This process is essential to ensure that the vehicle’s emissions system is functioning properly and meets regulatory standards.

Proper completion of the drive cycle is crucial for passing emissions tests and maintaining a vehicle’s environmental compliance. Following the recommended drive cycle procedure helps in resetting the catalyst monitor and ensuring optimal vehicle performance.

Gm Catalyst Monitor Drive Cycle: Quick Pass Tips

Credit: m.youtube.com

Introduction To Gm Catalyst Monitor

To complete the GM Catalyst Monitor drive cycle, follow specific driving conditions such as cold start, idle, acceleration, steady speed, and deceleration. This process ensures that the Catalyst monitor sets within a reasonable amount of time after a few highway drives, allowing for the completion of Oxygen sensor and Catalyst monitor tests.

GM Catalyst Monitor Drive Cycle
Introduction to GM Catalyst Monitor
The GM Catalyst Monitor plays a crucial role in emissions control by monitoring the efficiency of the catalytic converter.
Incomplete drive cycles can prevent the Catalyst Monitor from completing readiness status, leading to inspection failures.

Preparing For The Drive Cycle

Preparing for the GM Catalyst Monitor Drive Cycle is crucial for ensuring the readiness of your vehicle’s catalyst monitor. By following the OBDII driving cycle guidelines, which include cold starts, idling, accelerating, holding steady speeds, and decelerating, you can successfully complete the drive cycle and ensure that your catalyst monitor is ready for inspection.

GM Catalyst Monitor Drive Cycle
Preparing for the Drive Cycle
Cold Start: Initiating the Process
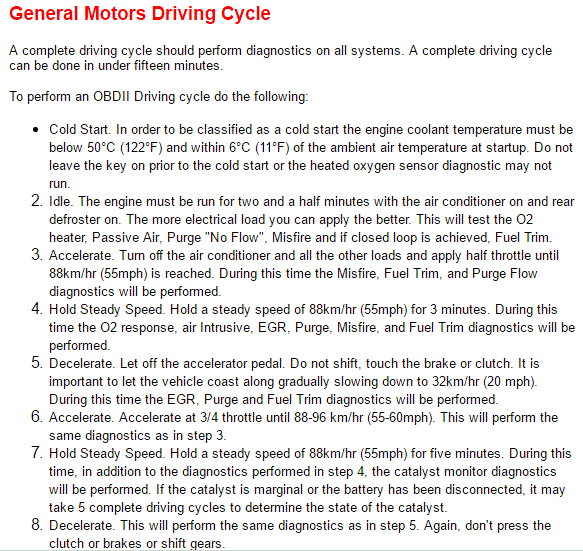
To perform an OBDII driving cycle for GM vehicles, there are certain steps that need to be followed. The first step is the cold start, which initiates the process. The idle phase is also important and needs to be understood properly. It is during this phase that the conditions required for the catalyst monitor to run are set. These conditions include vehicle speed, throttle amount, and their combination over time. Accelerating, holding steady speed, and decelerating are the other phases in the drive cycle that need to be completed. Some logged codes may require five or more cycles before they reset. The catalyst monitor usually sets within a reasonable amount of time after a few highway drives or less. It is important to follow the GM drive cycle procedure correctly to ensure that the catalyst monitor is ready for inspection.

Executing The Drive Cycle

When it comes to executing the drive cycle for GM vehicles, there are a few techniques to keep in mind. First, start with a cold start and let the engine idle for a period of time. Then, accelerate using proper techniques, making sure to avoid sudden jerks or excessive revving of the engine. Hold a steady speed for a while, maintaining consistency without any sudden changes. Decelerate gradually, again avoiding any sudden braking. Repeat the process of accelerating, holding a steady speed, and decelerating. This cycle helps to ensure that all the necessary monitors, including the catalyst monitor, run properly. It is important to note that the catalyst monitor requires specific conditions to run, such as vehicle speed and throttle usage. By following these steps, you can complete a successful GM drive cycle.

Deceleration And Its Role

When it comes to completing a GM Catalyst Monitor Drive Cycle, the deceleration phase plays a crucial role in ensuring the activation of the monitor. During the deceleration phase, it is important to hold a steady speed and then decelerate in order to meet the specific conditions required for the monitor to run. By repeating acceleration and deceleration cycles, the vehicle’s onboard diagnostic system can effectively evaluate the performance of the catalytic converter and other emissions-related components. This process is essential for achieving readiness status for emissions testing and ensuring that the vehicle meets environmental compliance standards.

Common Catalyst Monitor Issues

GM Catalyst Monitor Drive Cycle
Common Catalyst Monitor Issues
Catalyst Monitor Not Ready: Causes

One of the most common catalyst monitor issues is when the monitor is not ready. This can be caused by drive pattern variations and monitor readiness. To perform an OBDII driving cycle for GM vehicles, start with a cold start, then idle, accelerate, hold steady speed, decelerate, accelerate again, hold steady speed again, and finally decelerate one more time.

The monitor requires certain conditions to run, such as vehicle speed and the amount of throttle over time. If you only drive around town, the catalyst monitor may never run. It usually takes one drive cycle to clear error codes, but some logged codes require five or more cycles before they reset. It is possible to run the vehicle at a steady cruise to complete the Oxygen sensor and Catalyst monitor tests first, and then run the EGR monitor.

Gm Catalyst Monitor Drive Cycle: Quick Pass Tips

Credit: www.rlescalambre.net

Tips For A Successful Drive Cycle

To successfully complete a GM Catalyst Monitor Drive Cycle, it is important to follow specific guidelines. This includes starting with a cold start, idling, accelerating, holding steady speed, and decelerating in a specific order. By following these steps and meeting certain conditions, the Catalyst monitor will be ready for inspection.

To complete a successful GM Catalyst Monitor Drive Cycle, follow these steps:
– Start with a Cold Start and let the engine idle.
– Accelerate to a certain speed, then hold steady for a period.
– Decelerate and repeat the acceleration and steady speed steps.
– Ensure a mix of urban and highway driving to meet monitoring conditions.
– Check the Catalyst Monitor readiness after a few highway drives.

Understanding Obd Ii Readiness Monitors

OBD II Monitor Readiness and Drive Cycle is crucial for clearing error codes. The Drive Cycle’s Role in Error Code Clearance is significant as it helps to complete a set of self-diagnostic routines. Understanding OBD II Readiness Monitors is essential for vehicle emissions testing. The monitor requires specific conditions such as vehicle speed and throttle amount. To clear error codes, it normally only takes one drive cycle. However, some codes may require five or more cycles before they reset. The Catalyst monitor usually sets within a reasonable amount of time after a few highway drives or less. It is important to follow the prescribed drive cycle for your vehicle to ensure all readiness monitors are completed before an emissions test.

Troubleshooting Drive Cycle Problems

Gm Catalyst Monitor Drive Cycle

Gm Catalyst Monitor Drive Cycle: Completing the GM drive cycle is essential for the readiness of the catalyst monitor. Resetting the GM Catalyst Monitor can be a challenging task, but it is crucial for effective troubleshooting. Alternative methods for completing the drive cycle without driving can be considered to ensure the proper functioning of the catalyst monitor. Understanding the conditions required for the catalyst monitor to run is important, including vehicle speed, throttle amount, and duration. Knowing how many miles are needed to complete a drive cycle and clear error codes is also beneficial. It is vital to follow the OBD II drive cycle procedure for GM vehicles to ensure the readiness of the catalyst monitor for emissions testing.

Model-specific Drive Cycle Information

For GM Catalyst Monitor Drive Cycle information, ensure a cold start, idle, accelerate, hold steady speed, decelerate, and repeat to complete the cycle successfully. This process allows the Catalyst monitor to run effectively and reset any error codes. Drive carefully to meet the specific conditions required for the monitor to function properly.

Gm Catalyst Monitor Drive Cycle
Chevy Malibu: Drive Cycle Procedures
Ford and GM Variations: EVAP and Oxygen Sensor Considerations
To complete a GM drive cycle, follow the OBDII driving cycle steps: Cold Start, Idle, Accelerate, Hold Steady Speed, Decelerate. The Catalyst monitor requires specific conditions like vehicle speed and throttle. One drive cycle typically clears error codes, but some may need multiple cycles. The Catalyst monitor usually sets after highway drives. For GM vehicles, there are specific drive cycle procedures based on the model. Drive cycles are essential for inspections and smog checks. Monitor readiness and completion are crucial for passing emissions tests.

Finalizing The Drive Cycle

To finalize the GM Catalyst Monitor drive cycle, start with a cold start, followed by idling, acceleration, holding a steady speed, and deceleration. It’s important to meet specific driving conditions over time to ensure the monitor runs effectively and clears error codes.

Gm Catalyst Monitor Drive Cycle
Finalizing the Drive Cycle
Ensuring All Monitors are Ready
To complete a GM drive cycle, follow the OBDII driving cycle which includes a cold start, idling, accelerating, holding steady speed, and decelerating. The catalyst monitor requires certain conditions to run, such as vehicle speed and throttle amount over time. To get the catalyst monitor to run, try driving on highways or steady cruises. Error codes normally take only one drive cycle to clear, but some require five or more cycles. It is also important to confirm the completion of the drive cycle through validation.
Gm Catalyst Monitor Drive Cycle: Quick Pass Tips

Credit: www.rlescalambre.net

Frequently Asked Questions

How Do You Complete A Gm Drive Cycle?

To complete a GM drive cycle, follow these steps: Start the vehicle when it’s cold, then let it idle. Accelerate, then hold a steady speed. Decelerate, then accelerate again. Hold a steady speed once more, and then decelerate. This cycle helps the vehicle’s monitors to run properly.

Why Is My Catalyst Monitor Not Ready?

Your Catalyst monitor may not be ready due to specific driving conditions needed for activation. Ensure varied speeds and throttle use for proper activation.

How Many Miles To Complete A Drive Cycle?

A drive cycle typically requires about 100 miles to complete successfully for most vehicles.

How Many Drive Cycles Does It Take To Clear A Code?

It typically takes one drive cycle to clear error codes, but some codes may require five or more cycles. To perform a GM drive cycle, start with a cold start, idle, accelerate, hold steady speed, and decelerate. Repeat the acceleration, steady speed, and deceleration steps.

Conclusion

Completing a GM Catalyst Monitor Drive Cycle is essential for ensuring the readiness of the vehicle’s catalytic converter. By following the steps of a cold start, idling, accelerating, holding steady speed, and decelerating, you can meet the necessary conditions for the monitor to run.

It is important to note that the catalyst monitor may not run if you only drive in town. Understanding the drive cycle and its importance for passing inspections and clearing error codes will help you maintain your vehicle’s performance.

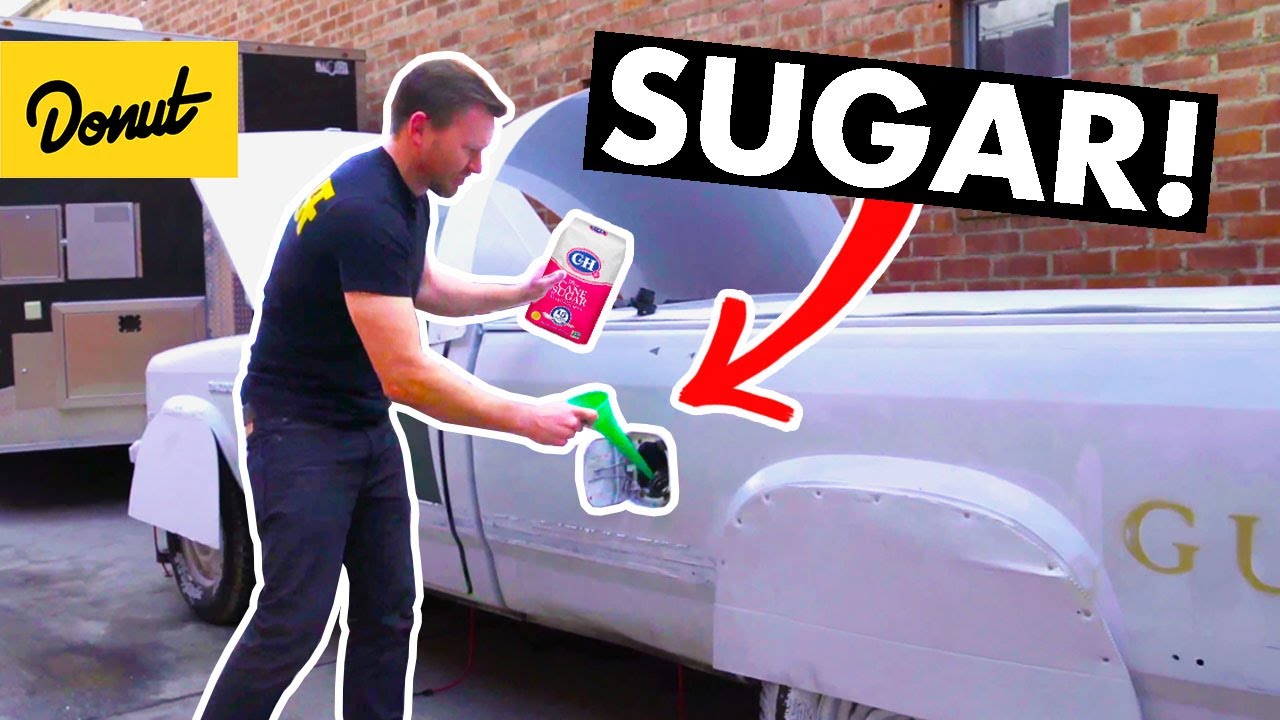
What Happens When You Put Sugar In A Gas Tank: Myth Busted!

Putting sugar in a gas tank can clog fuel lines, filters, and injectors, leading to costly repairs. When sugar is poured into a gas tank, it does not dissolve in gasoline and can cause blockages in the fuel system.

This can prevent the engine from receiving the necessary fuel, resulting in poor performance or even engine failure. The sticky residue left behind by the sugar can also cause further damage by clogging up the fuel lines and filters. Ultimately, the presence of sugar in a gas tank can lead to extensive repairs and potentially ruin the engine if not addressed promptly.

It is a harmful act that can result in significant financial consequences for the vehicle owner.

What Happens When You Put Sugar In A Gas Tank: Myth Busted!

Credit: www.reddit.com

The Sugar In Gas Tank Myth

Putting sugar in a gas tank does not dissolve, but it can clog the fuel filter and injectors, leading to costly damage. If sugar is detected, the tank should be drained, and the fuel lines flushed. Starting the engine could necessitate fuel injector replacement.

It’s a harmful prank that could result in significant expenses.

Putting sugar in a gas tank is a myth with no scientific evidence to back it up. The belief likely originated from the idea that sugar could caramelize and damage the engine.
In reality, sugar does not dissolve in gasoline and would simply pass through the engine without causing any significant harm. Cleaning the tank and fuel lines may be necessary if sugar is detected.
It is important to address any vandalism promptly and consider contacting your insurance company if damage has been done to your vehicle.
What Happens When You Put Sugar In A Gas Tank: Myth Busted!

Credit: www.wikihow.com

The Science Of Sugar And Fuel

Sugar and gasoline are both composed of carbon, hydrogen, and oxygen atoms. However, they have different chemical properties that affect how they react when mixed together. When sugar is added to a gas tank, it does not dissolve in gasoline and settles at the bottom of the tank. This can cause several problems, such as clogging fuel filters, fuel lines, and injectors, leading to engine damage and reduced fuel efficiency. Moreover, sugar can attract moisture, creating a breeding ground for bacteria and fungi that can further damage the fuel system and engine.

Gasoline works by being ignited by a spark that ignites the fuel and air mixture in the engine, creating an explosion that powers the car. However, sugar does not ignite and can cause engine failure, leading to costly repairs. Therefore, it is essential to avoid putting sugar in a gas tank and seek professional help if it happens accidentally or intentionally.

Experimenting With Sugar And Gasoline

When sugar is put in a gas tank, it can cause significant damage to the engine and fuel system. The sugar can clog the fuel injectors and fuel filter, leading to costly repairs and potentially requiring the fuel lines to be flushed.

It is important to address this issue promptly to prevent further damage to the vehicle.

Experimenting with Sugar and Gasoline
Controlled Tests
There have been several experiments conducted to determine the effects of sugar in a gas tank. One such experiment was conducted by MaxTheCarGuy on YouTube. In the experiment, sugar was added to the gas tank and the car was started to see the effects. The video showed that the car was able to start and run but with reduced power and performance. This was due to the sugar clogging up the fuel lines and filters. Another experiment was conducted by mrpete222 on YouTube. In this experiment, the factory gas tank was removed, filled with gasoline, and then sugar was added. The fuel lines were checked and it was found that the sugar had clogged the lines and caused damage to the fuel injectors. In real-world scenarios, putting sugar in a gas tank can cause a lot of damage. It can clog fuel lines, filters, and injectors, resulting in reduced performance and costly repairs. If someone puts sugar in your gas tank, it’s important to have the fuel lines flushed and the tank drained. It’s also important to have comprehensive insurance coverage to cover the damages.
What Happens When You Put Sugar In A Gas Tank: Myth Busted!

Credit: www.youtube.com

Potential Effects On Car Components

Sugar in a gas tank can lead to potentially damaging effects on car components. It can clog fuel lines, fuel injectors and fuel filters, leading to engine damage. If sugar is found in a gas tank, it is important to drain all the gas and flush the fuel lines to avoid further damage.

Potential Effects on Car Components
Fuel Filter Reactions
Putting sugar in a gas tank can have detrimental effects on various car components. The fuel filter is one of the components that can be affected. If there is too much sugar in the gas tank, it can clog the fuel filter, leading to reduced fuel flow and potential engine performance issues. In such cases, the fuel filter may need to be replaced to restore proper functionality. It is important to address the issue promptly to prevent further damage to the engine and other parts of the fuel system.
Fuel Injector Vulnerabilities
Fuel injectors are also vulnerable to the effects of sugar in a gas tank. If the engine is started with sugar in the fuel system, the sugar can cause damage to the fuel injectors, potentially leading to decreased fuel efficiency and engine performance. In such cases, the fuel injectors may need to be replaced to ensure proper fuel delivery. It is crucial to address the issue promptly and have the fuel system thoroughly cleaned to prevent further damage and maintain the optimal functioning of the engine.

Debunking The Engine Destruction Claim

Putting sugar in a gas tank doesn’t actually cause the extensive damage that many people believe. The notion that sugar will ruin a car’s engine is a myth that has been debunked by experts. When sugar is added to a gas tank, it doesn’t dissolve well and will likely be filtered out before reaching the engine. Additionally, the small amount of sugar that may make it to the engine will not cause any significant damage. Expert opinions and real-life tests have shown that adding sugar to a gas tank will not lead to the destruction of the engine. Therefore, the claim that sugar can ruin a car’s engine is unfounded.

Cleaning A Sugar-contaminated Gas Tank

Putting sugar in a gas tank can cause serious damage to the engine. It can clog the fuel filter and fuel injectors and may require draining all the gas out and flushing the fuel lines. To clean a sugar-contaminated gas tank, it is important to remove the tank, drain the gas, and flush the tank with water and cleaning solution.

Putting sugar in a gas tank can lead to serious engine damage.
Immediate Steps
1. Drain the contaminated fuel immediately.
2. Do not start the engine to prevent further damage.
3. Tow your vehicle to a professional mechanic for thorough inspection.
Professional Interventions
1. Flushing the fuel lines and cleaning the gas tank.
2. Replacing fuel injectors if necessary.
3. Inspecting and cleaning other affected engine components.

Legal Consequences Of Sugar In The Tank

Putting sugar in a gas tank is considered vandalism and is illegal. It can cause significant damage to the engine and fuel system. If someone puts sugar in your gas tank, it can lead to costly repairs and potential insurance claims. However, whether it is considered a felony or misdemeanor depends on various factors. In terms of insurance, comprehensive coverage may cover vandalism such as sugar in the gas tank, but it’s important to check your policy to confirm coverage. Ultimately, the consequences of sugar in a gas tank can be severe, leading to financial and legal implications for the perpetrator.

Preventive Measures And Tips

What Happens When You Put Sugar In A Gas Tank
When it comes to protecting your gas tank, it’s important to be aware of potential threats. If you become a target of vandalism, such as someone putting sugar in your gas tank, there are a few key steps to take. First, ensure to avoid starting the engine, as this could cause further damage. Next, have the vehicle towed to a trusted mechanic to assess the extent of the damage and perform the necessary repairs. It’s also crucial to check if your insurance policy covers vandalism-related damage, including sugar in the gas tank. By taking these preventive measures and being prepared for such situations, you can minimize the impact of potential damage to your vehicle.

Conclusion And Final Thoughts

Summary of Findings:

Putting sugar in a gas tank is not a harmless prank as believed. It can cause serious damage to the vehicle.

Sugar can clog fuel lines and damage the fuel injectors, requiring costly repairs.

Flushing the fuel system and replacing parts may be necessary if sugar is detected.

Insurance coverage for such vandalism may be available under comprehensive policies.

Ultimately, putting sugar in a gas tank is a costly and harmful act that should be avoided.

Frequently Asked Questions

What To Do If Someone Put Sugar In Your Gas Tank?

If sugar is put in your gas tank, drain the gas, flush the fuel lines, and possibly replace fuel injectors.

Is Putting Sugar In A Gas Tank A Felony?

Putting sugar in a gas tank is prohibited, but whether it’s a felony depends on various factors.

Will Insurance Pay If Someone Puts Sugar In My Gas Tank?

If someone puts sugar in your gas tank, it can cause significant damage to your car. Insurance may cover the repair costs if you have comprehensive coverage. However, it is important to check with your specific insurance policy to confirm coverage for vandalism such as sugar in the gas tank.

What Happens If You Put Salt In A Gas Tank?

Putting salt in a gas tank can cause corrosion and damage the engine over time.

Conclusion

Putting sugar in a gas tank can cause significant damage to a vehicle. Apart from the need to drain out all the contaminated fuel, the fuel lines may require flushing, and the fuel injectors might need replacing if the engine was started.

It is important to note that putting sugar in a gas tank is prohibited and can lead to legal consequences. If you have comprehensive auto insurance, it may cover the damages caused by this act of vandalism. However, it is always best to avoid such actions and resolve conflicts peacefully.

Oxygen Sensor Monitor Not Ready: Quick Fix Guide

If your Oxygen Sensor Monitor is not ready, your vehicle’s computer hasn’t checked emissions parts yet. This means it cannot verify if everything is functioning properly.

The “Not Ready” status indicates that the emissions control system hasn’t been fully evaluated for any issues, leading to the uncertainty of its operational efficiency. When encountering this message, it’s crucial to address the underlying causes and complete the necessary driving cycles to ensure the system is fully operational and compliant with emission standards.

By understanding the implications of an “Oxygen Sensor Monitor Not Ready” status, you can take proactive steps to rectify the situation and ensure your vehicle meets regulatory requirements.

Oxygen Sensor Monitor Not Ready: Quick Fix Guide

Credit: www.youtube.com

Introduction To Oxygen Sensor Monitor Issues

Introduction to Oxygen Sensor Monitor Issues: When the oxygen sensor monitor shows ‘Not Ready’, it indicates potential problems with the emissions control system.

Common reasons for ‘Not Ready’ status: Issues such as a weak catalyst, air leaks in the exhaust system, or a depleted battery can prevent the sensor from setting to ‘Ready’.

Impact on vehicle emissions and performance: A ‘Not Ready’ oxygen sensor can lead to increased emissions and reduced fuel efficiency, affecting the overall performance of the vehicle. Ensuring the sensor is set to ‘Ready’ is crucial for optimal operation and environmental impact.

Understanding Drive Cycles

Oxygen Sensor Monitor Not Ready

Oxygen Sensor Monitor Not Ready is a common issue that can prevent a vehicle from passing emissions tests. Understanding Drive Cycles is essential in addressing this problem. The drive cycle is a sequence of operating conditions that must be met for the vehicle’s emissions system to complete a full diagnostic cycle. Each phase of the drive cycle involves specific driving conditions, such as highway driving, stop-and-go traffic, and idling. By following the manufacturer’s recommended drive cycle, drivers can ensure that the oxygen sensor and other emissions-related monitors are ready for testing. It’s important to note that incomplete drive cycles can lead to a “not ready” status for the oxygen sensor, indicating that the vehicle’s computer has not fully evaluated the emissions control system. By completing the drive cycle, drivers can help resolve the oxygen sensor monitor readiness issue.

Troubleshooting The ‘not Ready’ Status

If your vehicle’s oxygen sensor monitor is showing a ‘Not Ready’ status, there are a few initial checks and common fixes you can try. Start by assessing the role of the battery in sensor readiness. A weak battery can prevent the oxygen sensor monitor from completing its checks. If your battery is more than four years old, it may need to be replaced. Additionally, check for any air leaks in the exhaust system that could introduce oxygen and affect the sensor’s readings. Ensuring a proper seal can help resolve this issue. Finally, make sure to follow the manufacturer’s recommended drive cycle to allow the sensor to complete its checks. By addressing these common issues, you can troubleshoot the ‘Not Ready’ status of your oxygen sensor monitor.

Oxygen Sensor Monitor Not Ready: Quick Fix Guide

Credit: www.aa1car.com

Resetting The Oxygen Sensor Monitor

Resetting the oxygen sensor monitor is a simple process that can be done in a few easy steps. First, make sure your vehicle is parked and turned off. Then, disconnect the battery and wait for at least 15 minutes to reset the computer. Once you reconnect the battery, start the engine and let it idle for a few minutes. After that, take your vehicle for a drive on the highway for about 20 minutes. Make sure to drive at a steady speed and avoid any sudden stops or accelerations.

When resetting the oxygen sensor monitor, there are a few common errors that you should avoid. These include disconnecting the battery for too short of a time, driving for too short of a distance, or driving at inconsistent speeds. By following the step-by-step reset procedure and avoiding these common errors, you can ensure that your oxygen sensor monitor is ready for your next emissions test.

Mileage Requirements For Sensor Reset

To reset the Oxygen Sensor Monitor, you need to fulfill mileage requirements by driving a specific distance. If the monitor is not ready, it means the vehicle’s computer has not checked all parts of the emissions control system for problems.

Mileage Requirements for Sensor Reset
When the “oxygen sensor monitor” is not ready, it means the vehicle’s computer has not checked all parts of the emissions control system for any problems. To determine if everything is working as designed, the computer needs to complete a series of tests known as the “drive cycle.” The number of miles required to complete the drive cycle varies depending on the vehicle make and model. Real-world examples show that it can range from 50 miles to over 100 miles. However, driving distance is not the only factor that affects sensor readiness. Other factors such as driving conditions, fuel type, and engine temperature can also impact the drive cycle. Therefore, it is recommended to check the vehicle’s owner’s manual or consult a mechanic to determine the specific mileage requirement for sensor reset.

Catalytic Converter’s Influence On Sensor Readiness

The influence of the catalytic converter on sensor readiness, particularly the oxygen sensor monitor not being ready, can indicate potential issues with the emissions control system. When the oxygen sensor monitor is not ready, it means that the vehicle’s computer has not yet checked all components of the system for problems.

This can affect the vehicle’s ability to determine if everything is working as designed.

If your vehicle’s oxygen sensor monitor shows as not ready, it could be due to catalytic converter issues. Identifying a weak catalytic converter is crucial in solving this problem. One possible solution is to check for air leaks in the exhaust system that introduce excess oxygen. Additionally, if the drive cycle won’t complete, it might indicate a weak battery. Replacing an old battery could help reset the oxygen sensor monitor. Ensuring the catalytic converter is functioning properly is key to improving sensor readiness.

Dealing With Air Leaks In The Exhaust System

Oxygen Sensor Monitor Not Ready indicates that the vehicle’s computer has not completed checking all parts of the emissions control system for issues. This results in the inability to confirm if everything is functioning as intended. One common cause is air leaks in the exhaust system, which introduce additional oxygen, affecting sensor readiness. To address this, detecting and fixing air leaks is crucial. Using diagnostic tools to detect air leaks and inspecting the exhaust system for damaged components can help improve sensor readiness. Additionally, fixing air leaks by repairing or replacing damaged parts can contribute to achieving the required sensor readiness for the oxygen monitor.

Professional Help And Diagnostic Tools

When experiencing persistent issues with the oxygen sensor monitor, it may be necessary to seek assistance from a qualified automotive professional. They have the expertise and specialized diagnostic tools to accurately identify and address the underlying problems.

Using OBDII scanners for troubleshooting can provide valuable insights into the performance of the oxygen sensor monitor. These tools enable the retrieval of specific error codes and real-time data, aiding in the diagnosis of potential malfunctions.

Legal And Environmental Considerations

To ensure compliance with legal and environmental regulations, it is crucial for the oxygen sensor monitor to be ready. A “not ready” status indicates that the vehicle’s computer has not yet checked all emissions control system components for potential issues, potentially leading to environmental non-compliance.

Regular monitoring and maintenance are essential to address this issue and uphold legal and environmental standards.

Emissions regulations and testing
Issues with Oxygen Sensor Monitor Not Ready can lead to legal repercussions. Car emissions must meet environmental standards. When the sensor is faulty, it impacts emission control. Compliance with regulations is crucial for environmental protection.

Preventative Measures And Maintenance Tips

Routine maintenance is crucial for preventing the ‘Not Ready’ status on your oxygen sensor monitor. Regularly replacing your car’s air filter, spark plugs, and fuel filter can help keep your engine running smoothly and reduce emissions. Additionally, ensuring that your gas cap is tightly sealed can prevent evaporation and leakage of fuel. Long-term strategies for maintaining your oxygen sensor include using high-quality fuel and additives, avoiding excessive idling, and driving at moderate speeds. If your car does enter ‘Not Ready’ status, performing a proper drive cycle can reset the sensor. The drive cycle involves driving for a specific amount of time at various speeds to allow the sensor to collect data and complete its diagnostic tests. Refer to your car’s manual or a trusted mechanic for instructions on performing the drive cycle.

Oxygen Sensor Monitor Not Ready: Quick Fix Guide

Credit: forum.ih8mud.com

Frequently Asked Questions

How Do I Get My Oxygen Monitor Ready?

To get your oxygen monitor ready, ensure your vehicle completes a drive cycle to allow the computer to check all emission control system parts for issues.

How Long Does It Take For An O2 Sensor To Be Ready?

The O2 sensor usually takes about 50-100 miles of driving to be ready for testing.

What Does “oxygen Sensor Not Ready” Mean?

When your vehicle’s oxygen sensor is not ready, it means that the computer has not yet had the opportunity to check all parts of the emissions control system for any potential issues. As a result, it cannot determine if everything is functioning as intended.

How Many Miles Do You Have To Drive To Reset An Oxygen Sensor?

To reset an oxygen sensor, you typically need to drive around 50 to 100 miles.

Conclusion

Dealing with an “Oxygen Sensor Monitor Not Ready” issue can be frustrating, but it’s important to understand the underlying causes. By following the proper drive cycle and ensuring that all components of the emissions control system are functioning correctly, you can reset the oxygen sensor monitor.

Remember to check for any air leaks or weak batteries that may be affecting the monitor’s readiness. With some patience and troubleshooting, you’ll be able to resolve the issue and ensure your vehicle is operating efficiently.

Fuel System Not Ready: Quick Fixes for Common Issues

To get the fuel system ready, ensure the Malfunction Indicator Light is off and there is enough fuel. Driving city and highway routes for a few days typically readies the system.

When monitors remain “not ready,” check for power loss or EVAP system issues. The fuel system monitor must be in the ready state to pass emissions tests. In certain cases, a VAG scan tool can help diagnose fuel trim problems causing readiness issues.

Through proper troubleshooting and drive cycles, the fuel system can be successfully prepared for testing and performance.

Fuel System Not Ready: Quick Fixes for Common Issues

Credit: www.reddit.com

Identifying Fuel System Readiness Issues

Identifying fuel system readiness issues involves ensuring the MIL is off, having enough fuel, and completing the drive cycle. Monitors may not be ready due to power loss or EVAP system problems. Fixing the issue requires addressing the root cause and following a specific drive cycle.

First, ensure that the Malfunction Indicator Light is off.
Next, verify that there is an adequate fuel level.
Then, complete the required driving cycle.
To get the OBD monitors ready, normal driving for a few days is usually sufficient. If a specific drive cycle is unknown, a universal drive cycle guideline can be followed. Issues with the vehicle’s OBD system being not ready may stem from power loss due to battery replacement or repair work. It’s uncommon for the fuel system monitor to be incomplete, and immediate readiness is expected for certain monitors like Misfire and Fuel System. If facing issues with the fuel system monitor readiness, using a VAG capable scan tool to check fuel trims is recommended for diagnosis.
Fuel System Not Ready: Quick Fixes for Common Issues

Credit: www.golfmk7.com

Common Causes For Fuel System Alerts

Fuel System Not Ready

When fuel system alerts occur, it may be due to battery replacement or disconnection. Incomplete drive cycles can also trigger the alerts. To resolve this, ensure the Malfunction Indicator Light is off and the vehicle has sufficient fuel. Completing a drive cycle, encompassing both city and highway driving, typically readies the monitors. It’s important to address any power loss to the OBD system, which can result from battery replacements or disconnecting the battery. This can impact the readiness of OBD monitors, including the fuel system monitor. Performing a universal drive cycle may assist in resetting the monitors if a specific drive cycle is unknown.

Initial Diagnostic Steps

Initial Diagnostic Steps:

When diagnosing a fuel system that is not ready, it is important to follow these initial steps:

  • Check the Malfunction Indicator Light (MIL) to ensure it is not commanded on.
  • Verify that the car has enough fuel by checking the fuel levels.
  • Complete the “drive cycle” to assist in resetting the monitors.

Typically, a few days of normal driving, both city and highway, will make the monitors ready. If a specific drive cycle is not known, a universal drive cycle can be used as a guideline.

It is important to note that a power loss to the vehicle’s OBD system may cause the monitors to read “not ready.” This can occur when the vehicle’s battery is replaced or when repair work is done that requires the battery to be disconnected.

By following these initial diagnostic steps, you can begin troubleshooting and resolving the issue with the fuel system not being ready.

Performing A Drive Cycle

The fuel system monitor is an important component of a vehicle’s OBD system. If it is not ready, it can cause an emissions test failure. To ensure that the fuel system monitor is ready, a generic drive cycle can be used as a guideline if a specific drive cycle is not known. This will help reset the monitors when a car specific drive cycle is not available. Typically, a few days of normal driving, both city and highway, will make the monitors ready. However, if the fuel system monitor is still not ready, it may be due to a power loss to the vehicle’s OBD system or other issues. In such cases, it is recommended to use a VAG capable scan tool or consult a professional technician to diagnose and fix the problem.

Troubleshooting The Evap System

When it comes to troubleshooting the EVAP system, one common issue that drivers face is when the drive cycle won’t complete. This can result in the fuel system monitor showing as “not ready” during emissions testing.

To ensure that the drive cycle completes successfully, there are a few steps that can be taken. First, check that the MIL (Malfunction Indicator Light) is not commanded on. Second, ensure that there is enough fuel in the car. Finally, complete the drive cycle, which typically requires a few days of normal driving, both city and highway. If a specific drive cycle is not known, a universal drive cycle can be used as a guideline.

If the drive cycle still won’t complete, there may be an issue with the EVAP system. Common causes of EVAP issues include power loss to the vehicle’s OBD system, a faulty gas cap, or a leak in the system. It’s important to address these issues promptly to ensure that the fuel system monitor is ready for emissions testing.

Fuel System Not Ready: Quick Fixes for Common Issues

Credit: www.reddit.com

Reading And Interpreting Fuel Trims

Reading and Interpreting Fuel Trims: Utilize a scan tool to analyze high fuel trims and identify potential causes. Ensure the MIL is off, maintain sufficient fuel, and complete a proper drive cycle. In case of incomplete fuel system monitor, check fuel trims with a VAG scan tool for resolution.

Preventative Measures And Maintenance

Regular Inspection and Servicing: It is crucial to regularly inspect and service your vehicle’s fuel system to ensure its readiness. This includes checking for any leaks, worn-out components, or clogged filters. Timely servicing can prevent potential issues and keep the fuel system in optimal condition.

Tips to Maintain Monitor Readiness: Keep the fuel tank adequately filled to enable the completion of the drive cycle. Additionally, ensure that the Malfunction Indicator Light (MIL) is not illuminated. Following these tips will help maintain the readiness of the fuel system monitor.

Professional Assistance And Resources

When dealing with a fuel system that is not ready, it is essential to seek professional assistance. A mechanic can diagnose the issue and provide expert advice on the necessary steps to rectify the situation. Additionally, online forums and expert advice can offer valuable insights into troubleshooting and resolving fuel system readiness issues. These resources can provide guidance on when to seek a mechanic’s help and offer tips for addressing the problem effectively.

Frequently Asked Questions

How Do I Get My Fuel Monitor Ready?

To get your fuel monitor ready, follow these steps: first, check that the malfunction indicator light is not on; second, ensure that you have enough fuel in your vehicle; third, complete a drive cycle. Typically, a few days of normal driving will make the monitors ready, but you can also use a universal drive cycle as a guideline.

If your fuel system monitor is still incomplete, you may need to use a VAG capable scan tool to check your fuel trims and figure out why they are high.

How Long Does It Take Obd Monitors To Be Ready?

Typically, it takes a few days of normal driving, both city and highway, for OBD monitors to be ready. The MIL (Malfunction Indicator Light) should not be on, and there should be enough fuel in the car. Completing a drive cycle can also help to reset the monitors.

If a specific drive cycle is not known, a universal drive cycle can be used as a guideline.

How Do You Fix An Evap System Not Ready?

To fix an evap system not ready, first ensure that the MIL (Malfunction Indicator Light) is not turned on. Next, make sure that your vehicle has enough fuel. Finally, complete a drive cycle, which involves driving in various conditions, to reset the monitors.

This process may take a few days of normal driving.

Why Is My Obd System Not Ready?

The OBD system may not be ready due to a recent power loss or incomplete drive cycle. Ensure the MIL is off, fuel levels are adequate, and complete a drive cycle for the monitors to reset.

Conclusion

Getting your fuel system ready involves a few simple steps. First, ensure that the MIL (Malfunction Indicator Light) is not illuminated. Secondly, make sure you have enough fuel in your vehicle. Lastly, complete the drive cycle by engaging in normal driving for a few days, both in the city and on the highway.

By following these guidelines, you can ensure that your fuel system is ready for optimal performance.

Car Sounds Like It Has A Flat Tire But Doesn’t: Quick Fixes

Your car sounds like it has a flat tire but doesn’t could be due to tire pressure issues or a worn wheel bearing causing a similar noise. It’s essential to check your tire pressure first to ensure they are properly inflated.

Run-flat tires can sometimes give the impression of a flat tire even when they are not visibly deflated. Additionally, a bad wheel bearing can create a knocking noise that resembles a flat tire sound. Understanding these common causes can help diagnose and address the issue effectively, ensuring your car runs smoothly and safely.

Remember to address any potential tire or wheel bearing problems promptly to maintain optimal performance.

Identifying False Alarms

When your car sounds like it has a flat tire but doesn’t, it could be due to run-flat tires appearing inflated but actually not. Check all tire pressures to rule out false alarms. Consider inspecting for worn wheel bearings causing similar noises.

Tire inspection techniques
– Check air pressure first to ensure it meets specifications.
– Some tires, like run flats, may look inflated but actually aren’t.
– Verify all tires to rule out any potential issues causing the flat tire sound.

Common Causes Of Tire-like Noises

One of the most common issues that drivers experience is hearing a tire-like noise from their car, even when their tire is not actually flat. There are several reasons why this can happen, including:

  • Uneven tire wear, which can cause a rhythmic thumping or vibration
  • Wheel bearing issues, which can result in a humming or grinding noise
  • Worn out suspension components, which can cause a clunking or rattling noise

If you are experiencing any of these symptoms, it is important to have your car inspected by a professional mechanic. They will be able to diagnose the problem and recommend the necessary repairs to get your car back to its optimal performance.

Quick Diagnostic Tips

When your car sounds like it has a flat tire but doesn’t, you can perform a quick diagnostic by listening for noise patterns while driving at different speeds. Pay attention to any changes in the sound when turning or going over bumps. Additionally, conducting weight distribution tests by checking the tire pressure and inspecting for any visible damage can help identify the underlying issue. It’s important to rule out any potential tire-related issues such as a shifted steel belt or worn-out wheel bearings. By carefully analyzing the noise patterns and conducting simple tests, you can narrow down the potential causes of the unusual sound and take appropriate action to address the issue.

Diy Inspection Steps

When it comes to diagnosing why your car sounds like it has a flat tire but doesn’t, there are DIY inspection steps you can take. Start by performing a visual tire check. Inspect each tire for any visible signs of damage or wear, such as cuts, bulges, or uneven tread wear. Next, check the air pressure in each tire to ensure they are within the recommended specifications. Sometimes, tires that appear inflated may actually have low pressure, causing them to make noise. Additionally, check the wheel bearings at home. If the problem is a worn wheel bearing, you may hear a knocking noise. Another possible cause could be a flat spot in a tire, which can create a thumping sound. By following these inspection steps, you can pinpoint the source of the noise and take appropriate action.

Wheel And Tire Maintenance

Regular rotation and balancing of wheels and tires are crucial to keep your vehicle running smoothly. Proper maintenance not only extends the life of your tires but also improves fuel efficiency and enhances ride comfort. It is recommended to rotate your tires every 5,000 to 7,500 miles and balance them every 10,000 to 15,000 miles. This prevents uneven wear and tear on tires and eliminates vibrations that can cause your car to sound like it has a flat tire.

Understanding road force balancing
Road force balancing is a more advanced type of balancing that measures the force that the tire and wheel assembly puts on the road. This helps identify any hard spots in the tire, which can cause vibrations and noise. The process involves using a specialized machine that simulates the force of the road on the tire and wheel assembly and then adjusts the balance accordingly. This helps create a smoother, quieter ride and can eliminate the sound of a flat tire.
Car Sounds Like It Has A Flat Tire But Doesn't: Quick Fixes

Credit: wowowow.com

When To Seek Professional Help

If your car sounds like it has a flat tire but it doesn’t, it could be a sign of a bigger issue. It’s best to seek professional help from a mechanic to diagnose and fix the problem before it becomes more serious.

When to Seek Professional Help
Limitations of DIY approaches
Finding a trusted mechanic is crucial to accurately diagnosing and resolving issues. Attempting DIY fixes can exacerbate problems. Professional expertise ensures proper assessment and repair. Trust qualified mechanics for effective solutions.

Preventative Measures

Proper tire storage: Store tires in a cool, dry place away from direct sunlight to prevent rubber degradation.

Driving habits to avoid tire damage: Avoid sudden stops, sharp turns, and driving over potholes to prevent tire wear and tear.

Car Sounds Like It Has A Flat Tire But Doesn't: Quick Fixes

Credit: howwedrive.com

Advanced Troubleshooting

Advanced Troubleshooting:

Identifying suspension issues: When your car sounds like it has a flat tire, but it doesn’t, it could be due to worn shock absorbers, struts, or suspension components. These can create a bumpy or uneven ride and produce noises similar to a flat tire. Inspect for leaking shock absorbers, damaged struts, or worn suspension bushings.

Spotting brake component wear: Worn brake pads or warped rotors can cause a rubbing or scraping sound that mimics a flat tire noise. Check the brake pads for wear indicators and look for scoring or grooves on the rotors. Additionally, a loose or damaged brake shield can also produce similar noises.

Car Sounds Like It Has A Flat Tire But Doesn't: Quick Fixes

Credit: m.youtube.com

Frequently Asked Questions

Why Does My Car Sound Like I Have A Flat Tire When I Don’t?

Your car may sound like it has a flat tire even when it doesn’t due to a few reasons. One possibility is that your tires may have uneven wear or flat spots, causing the noise. Another reason could be a worn wheel bearing, which can create a knocking or thumping noise.

It’s also worth checking the air pressure in your tires, as some types, like run flats, may look inflated but actually aren’t.

Can A Bad Wheel Bearing Sound Like A Flat Tire?

Yes, a bad wheel bearing can produce a sound similar to a flat tire.

Why Does It Feel Like My Tire Is Flat But It’s Not?

Feeling like your tire is flat when it’s not can be caused by several factors. One common reason is low air pressure, which can make your tires look normal but feel flat. Another possibility is a shifted steel belt inside the tire, which can cause a bumpy ride.

A worn wheel bearing can also create a knocking or thumping noise that feels like a flat tire.

Why Is My Car Making A Womp Sound?

Your car may be making a womp sound due to a bad or worn-out wheel bearing. To check, drive on a flat road, turn the steering wheel slightly, and listen for changes in the noise.

Conclusion

If your car sounds like it has a flat tire but it doesn’t, it could be due to issues with air pressure, run-flat tires, worn wheel bearings, or damaged tires. To pinpoint the problem, it’s essential to check these factors and seek professional assistance if needed.

Maintaining your car’s components can prevent such sounds in the future.

Drive Cycle Chevy Silverado 1500: Quick Smog Check Prep Tips

To complete a drive cycle on a Chevy Silverado 1500, follow the OBDII driving cycle steps, including cold start, idle, accelerate, hold steady speed, and decelerate. Performing the drive cycle at least twice ensures all monitors, including EVAP, are ready for inspection.

Preparing your Chevy Silverado 1500 for a smog check involves completing a drive cycle, which involves specific driving patterns to ensure all emissions systems are functioning properly. By following the OBDII driving cycle guidelines, you can ensure that your vehicle is ready for inspection and meets the necessary emissions standards.

Understanding the drive cycle process is essential for maintaining compliance with environmental regulations and ensuring your vehicle operates efficiently. Let’s explore the key steps to successfully complete a drive cycle on your Chevy Silverado 1500.

Drive Cycle Chevy Silverado 1500: Quick Smog Check Prep Tips

Credit: media.chevrolet.com

Introduction To Drive Cycle Prep

Drive Cycle Prep: Getting your Chevy Silverado ready for a Smog Check involves completing a drive cycle to pass inspection. A GM drive cycle includes specific steps like cold start, idle, accelerate, and decelerate.

Importance of Drive Cycles: Completing a drive cycle ensures all monitors run, including the EVAP monitor, making your Chevy Silverado smog-ready. It’s crucial for a successful smog check.

Basics of Smog Checks: Performing a basic drive cycle is essential for OBDII drive cycle completion. Resetting monitors can be done in under fifteen minutes for a successful smog check.

Drive Cycle Chevy Silverado 1500: Quick Smog Check Prep Tips

Credit: www.caranddriver.com

Identifying Smog Check Requirements

When it comes to smog check requirements for your Chevy Silverado 1500, it’s important to know the legal standards. These standards vary by state and even by county, so it’s important to research what your specific area requires. One way to ensure that your Silverado meets these requirements is by completing a drive cycle. This involves a series of steps such as a cold start, idling, accelerating, holding a steady speed, and decelerating. Completing the drive cycle at least twice will ensure that all monitors run, including the EVAP monitor, and your Silverado is ready for a smog check. If you’re unable to complete a drive cycle by driving, an alternative is to use an OBD-II scanner to clear your vehicle’s internal code. Keep in mind that it’s essential to follow your local legal standards to avoid any penalties or fines.

Preparing Your Chevy Silverado

Before you start preparing your Chevy Silverado for a drive cycle, it’s important to have a pre-drive checklist. This includes checking the engine oil level, tire pressure, brakes, and ensuring all lights are working properly. Once you have completed the initial steps, you can begin the drive cycle by performing a cold start. This involves starting the engine when it’s cold and letting it run for a few minutes without any load. After that, you can begin to idle, accelerate, hold steady speed, and decelerate. Repeat this process a few times to ensure all monitors have run, including the EVAP monitor. Unfortunately, there’s no way to complete a drive cycle without driving, but you can use an OBD-II scanner to clear your vehicle’s internal code.

Understanding The Drive Cycle Process

Understanding the drive cycle process is crucial for ensuring that your Chevy Silverado 1500 is ready for a smog check. The cold start protocol is the initial phase of the drive cycle, during which the vehicle is started from a cold state. This is followed by the idle to accelerate transition, where the vehicle moves from a stationary position to a state of acceleration. Each step of the drive cycle is essential for the vehicle’s emissions system to complete its self-checks and readiness monitors, ensuring compliance with smog check requirements.

Executing The Drive Cycle

When it comes to executing the drive cycle for a Chevy Silverado 1500, there are a few key techniques to keep in mind. Maintaining a steady speed is crucial for a successful drive cycle. Avoid sudden accelerations or decelerations, as this can disrupt the process. Instead, aim for smooth and consistent speed throughout the drive. This will help the vehicle’s onboard diagnostic system to accurately monitor and evaluate the vehicle’s emissions and systems.

If you’re looking to complete a drive cycle without physically driving the vehicle, unfortunately, it’s not possible. Driving is necessary to trigger the different stages of the drive cycle. However, if you want to reset your vehicle’s internal codes without driving, you can use an OBD-II scanner. This will clear any stored codes in the vehicle’s system.

Remember, a properly executed drive cycle is important for passing an inspection or smog check. By following the guidelines for maintaining a steady speed and avoiding abrupt changes, you can ensure that your Chevy Silverado 1500 is ready for the drive cycle and any necessary tests.

Tips For A Successful Drive Cycle

To successfully complete a drive cycle on a Chevy Silverado 1500, it is important to follow the necessary steps. This includes a cold start, idle, acceleration, holding steady speed, deceleration, and repeating the process. Completing the drive cycle at least twice will ensure all monitors run, including the EVAP monitor, making your vehicle ready for a smog check.

Tips for a Successful Drive Cycle
Ensure optimal driving conditions to complete the cycle successfully.
Avoid common mistakes like abrupt stops to maintain consistency.

Post-drive Cycle: Analyzing Results

After completing a drive cycle for my Chevy Silverado 1500, I used an OBD-II scanner to interpret the data. By following the specific steps, including cold start, idle, acceleration, and deceleration, I ensured that the EVAP monitor and other readiness monitors were reset. This process is essential to prepare for a smog check and ensure that the vehicle is ready for inspection. Completing the drive cycle and analyzing the results using OBD-II scanners is crucial for maintaining the vehicle’s performance and meeting regulatory requirements.

Troubleshooting Drive Cycle Issues

When troubleshooting drive cycle issues in your Chevy Silverado 1500, it’s important to resolve EVAP monitor problems. If the monitors won’t run, consider completing a GM drive cycle by following specific steps such as cold start, idle, accelerate, hold steady speed, and decelerate. Unfortunately, there’s no way to complete a drive cycle without driving, but an alternative would be to use an OBD-II scanner to clear the vehicle’s internal code. Additionally, performing the drive cycle at least twice will ensure all monitors run, including the EVAP monitor, and your Chevy Silverado is ready for a smog check. General Motors Drive Cycle is crucial for smog check readiness, and resetting the monitors can be done in under fifteen minutes.

Alternative Solutions And Advice

Complete a GM drive cycle for your Chevy Silverado 1500 by performing a series of steps including a cold start, idling, accelerating, holding steady speed, and decelerating. Unfortunately, there is no way to complete a drive cycle without driving, but using an OBD-II scanner can clear your vehicle’s internal code.

Alternative Solutions and Advice
When Drive Cycle Isn’t an Option
Expert Recommendations
Complete a GM drive cycle by following specific steps: Cold start, idle, accelerate, hold steady speed, decelerate.
Unfortunately, there’s no way to complete a drive cycle without driving. An alternative is using an OBD-II scanner.
To ensure all monitors run, including EVAP, perform the drive cycle on your Chevy Silverado at least twice.
Resetting the monitors can be done in under fifteen minutes by completing an OBDII driving cycle.
Drive Cycle Chevy Silverado 1500: Quick Smog Check Prep Tips

Credit: www.gm-trucks.com

Final Steps Before Smog Check

Before taking your Chevy Silverado 1500 for a smog check, there are a few final steps you should take to ensure a successful outcome. One important step is to recheck the readiness monitors, which are indicators that all the required emissions control systems in your vehicle are functioning properly.

Here are some last-minute tips to help you prepare:

  • Make sure your vehicle has completed a full drive cycle, including a cold start, idle, acceleration, steady speed, and deceleration.
  • If any readiness monitors are still not ready, consult your vehicle’s manual for specific instructions on how to complete the drive cycle for that monitor.
  • Consider using an OBD-II scanner to clear any internal codes in your vehicle, if needed.
  • Perform a basic drive cycle to ensure all monitors are ready.
  • Reset the monitors if necessary.

By following these steps, you can increase the chances of passing your smog check and ensuring your Chevy Silverado 1500 is in compliance with emissions standards.

Conclusion: Ensuring Smog Success

Completing a drive cycle for a Chevy Silverado 1500 is crucial to ensure that the vehicle passes a smog check. Following the specific steps for a GM drive cycle, including cold starts, idling, acceleration, steady speed holding, and deceleration, is essential. Unfortunately, there is no alternative to driving to complete the drive cycle. Once the drive cycle is completed, all monitors, including the EVAP monitor, will run, ensuring that the vehicle is smog-ready. It’s important to follow these steps to maintain future compliance and avoid issues during smog checks. By resetting the monitors and completing the drive cycle, a Chevy Silverado can be ready for a smog check in a short amount of time, typically under fifteen minutes.

Frequently Asked Questions

How Do You Complete A Gm Drive Cycle?

To complete a GM drive cycle, follow these steps: Cold start, idle, accelerate, hold steady speed, decelerate, repeat.

How To Complete A Drive Cycle To Pass An Inspection?

To complete a drive cycle for an inspection, follow these steps for GM vehicles: Cold start the vehicle, let it idle, accelerate, hold a steady speed, decelerate, accelerate again, hold a steady speed, and decelerate. Unfortunately, there is no way to complete a drive cycle without driving.

You can use an OBD-II scanner to clear internal codes as an alternative.

How To Complete Drive Cycle Without Driving A Chevy?

To complete a drive cycle without driving a Chevy, you can’t. An alternative is to use an OBD-II scanner to clear the internal code.

How Do You Reset A Chevy Silverado?

To reset a Chevy Silverado, turn off the engine, disconnect the negative battery cable for 15 minutes, then reconnect.

Conclusion

Understanding the drive cycle for a Chevy Silverado 1500 is crucial for passing a smog check. By following the recommended steps for completing the drive cycle, you can ensure that all the necessary monitors run efficiently. This will help keep your vehicle in compliance with emissions standards and running smoothly.